Monday, March 30, 2015

Peek-A-Boo LambCard

Here is the first set of my 4 x 4" Easter gift card sets. This one features a cute little lamb playing Peek-a-boo.


I decided on making a set of 2 cards, but you could easily use one image on the outside of the card and the other on the inside, or even the back. Here is a closer look at the peeking lamb:


And here a closer look at the escaping lamb:


Supplies used:
Cardstock: Recollections 110 lbs white and Bazzill
Stamp: Crazy About You - SU
Ink: Memento Tuxedo Black, Sahara Sand, Calypso Coral, both SU
Die: Circles - Framelits - SU
Punches: see instructions below for details
Misc.: Foam mounting squares, 3/8" pink gingham ribbon, 3 x 3/8" pearls for each card, black marker, white gel pen, rose/red chalk

Full instructions are below.


Thanks for looking! Come back soon for another 4 x 4" Easter gift card set.


Saturday, March 28, 2015

Bloom with Hope Birthday Card

I have so many stamp sets that I just had to have but have not had a chance to use. Many of them are images that need to be coloured, which was never one of my favourite things to do. Now that I have my Blendabilities I have to say I am rather enjoying the colouring aspect.
So I thought I'd share another alcohol marker creation.

 
I love the look of the coloured flower placed over the black and white outlined images. It really adds an extra "pops" the design and draws your eye to the red. I wanted to also pop the flower with some foam mounting squares which meant I had to fuzzy cut the image. Not the easiest and next time I will opt to not use 110 lbs card for this. 60-70 lbs would be much easier to trim.


I made the inside to match, choosing one of the smaller flower images in the stamp set.

Supplies used:
Cardstock: Recollections
Ink: Tuxedo Black - Memento (fast becoming my favourite black ink)
Alcohol markers: Cherry Cobbler, Daffodil Delight, Old Olive - SU Blendabilities
Stamps: Bloom with Hope - SU
Punch: Modern Label - SU
Misc.: Blendabilities colour lifter, 3/8" black and white gingham ribbon, foam mounting squares, 3 x 3/8" rhinestones.

Thanks for stopping by. Hope to see you again soon. FYI I have 3 more punch art projects for Easter, my 4 x 4 gift cards. The instructions are almost complete so I will be able to share them this week.

Friday, March 27, 2015

Painter Bunny Easter Card

I have three kids, so of course I have a third gift card holder card to share. I created another bunny. He is the same design as the last, one punch, but I posed him differently. I also gave him him a paint brush. He reminds me of the Easter bunnies found in German Easter story books. He's just missing his glasses.


It's harder to tell in the photo, but my pearls aren't white. I used my Blendabilities marker to colour the pearls a light peachy-pink.
I also chose bright hues for this one even though it's a card for one of my sons. It's a bit of a secret, but he loves pink.

I left the inside a little plain, but did carry over the colours.


Supplies used:
Cardstock: Bazzill
Stamps: And Many More - SU, All Year Cheer 1 - SU
Die:  Timeless Rectangle - Nestabilities - Spellbinder
Ink: Sahara Sand, Blushing Bride, Strawberry Slush, Chocolate Chip, Basic Black - all SU
Alcohol marker: Skin tone - Blendabilities - SU
Misc.: 5/8" light blue satin ribbon, 3/8" pearls, white gel pen, black marker, foam mounting squares

Full punch art instructions below.


Thanks for stopping by! Hope to see you again soon; next will be some 4 x 4' Easter gift cards.

Wednesday, March 25, 2015

Easter Bunny Card

Today I am sharing my second gift card holder Easter card. This one is a cute Easter bunny. I choose subdued, masculine tones that would appeal to my son more than bright spring colours.


As with my chick, the punch art design uses a single punch (not including the eggs).
I carried the colour scheme over to the inside of the card which holds a gift card.

Supplies used:
Cardstock: Bazzill
Patterned paper: misc. scraps
Stamps:Teeny Tiny Wishes - SU, A Little Somthin' - SU
Die:  Oval Framelits - SU
Embossing folder:  Lacy brocade - SU
Punches: Word window - SU, Modern label - SU, Small, wide oval - SU (eggs), Owl punch, see below instructions
Ink: Crumb Cake - SU, Basic Black - SU, Daffodil Delight - SU, Strawberry Slush - SU, Always Artichoke - SU
Misc.: white gel pen, black marker, foam mounting squares, 5/8" tan organza ribbon, 3/16" perals, red/rose chalk

Full punch art instructions below:


Thanks for stopping by! Hope to see you again soon.

Monday, March 23, 2015

Chick Easter Gift Card Holder

As I don't usually send out cards for Easter making several would be a bit of a waste. I do however give gifts to my kids and often little treats to friends and family.

So although my next few projects are A2 cards they are also gift card holders.

First up is  my daughter's, a cute little spring chick just cracked out of it's shell.


I chose very bright and cheery spring colours which I carried over to the inside of the card.
The gift card is held in place by a strip of cardstock attached only on either side.


You may recognize the chick design, it's basically the same as my little Valentine owls. I love this design as it's a one punch creation.

Supplies used:
Cardstock: Bazzill
Patterned paper: Karen Foster (very old)
Stamps:  Wacky Wishes - SU, All Year Cheer 1  SU, A Little Somthin' - SU, Itty Bitty Banners - SU
Punches: Scallop oval - SU, Large, wide Oval - SU, Modern Label (punch art - Owl builder - SU)
Die: Labels Eighteen - Nestabilities - Spellbinders
Embossing Folder: Christmas Elegance - Sizzix
Ink: Crushed Curry, Daffodil Yellow, Garden Green, Old Olive, Pumpkin Pie - all SU
Alcohol marker: Blendabilities - skin tone (one of the peach tones) - SU
Misc.: floral ribbon trim (Doll-a-Rama), white gel pen, black marker, rose/red chalk, 3/8" pearls (top 3 were coloured with alcohol marker), foam mounting squares.

Full punch art instructions below.


Thanks for stopping by. Hope to see you again soon.

Sunday, March 22, 2015

Happy Easter Card

My absolutely wonderful SU rep, knowing I lost out on the green markers,  gifted me a package of Olive Green Blendabilities last week.

So of course I had to get to work on one more Indescribable Gift card making good use of them.
Here is the result:


I opted for yellow this time around and kept the card very simple with layers of white to keep the focus on the lovely blossoms. I also decided to add a touch of sparkle with random, tiny, rhinestones and a little glitter.

I wanted to feature the image inside a beautiful cut frame so I used a die to cut my frame and my coloured image. I used the negative/inside for the front of my card and the actual frame cut from the image on the inside to carry over the blossom theme.

Supplies used:
Cardstock: Recollections 110 lbs white
Stamps: Indescribable Gift - SU, Easter Blossoms - SU
Markers: Daffodil Delight, Old Olive, Soft Sky and Skin Tone Blendabilities - SU
Ink: Memento Tuxedo Black
Die:  Twisted Metal Tags and Accents - Shapeabilities - Spellbinders
Embossing Folder: Petals-A-Plenty - SU
Misc.: 1/16" and 1/8" clear rhinestones, 5/8" light blue organza ribbon, Foam mounting squares, Diamond Sparkles - PSX

Thanks for stopping by! Hope to see you again soon.

Saturday, March 21, 2015

Sheep Easter Favour

Today I am sharing the last of my Easter favours. Of course this is also made with the Curvy Keepsake die (you may wish to buy it if you don't have it yet). I love the shape of this die. It is so versatile. And if you'd rather just make a cute punch art card you can just trim one handled side and place this cute critter on a card front.


My sweet little lamb is holding a TicTac container but any little treat will work.  Here's a side view that lets you see the contents a little better.


Supplies used:
Cardstock: Bazzill
Ink: Crumb Cake, Strawberry Slush, Smokey Slate, all SU
Die: Curvy Keepsake - SU
Punches: see below instructions
Misc.: 5/8" gold organza ribbon, white gel pen, rose/pink chalk

Full instructions below.


Thanks for stopping by! Hope to see you again soon.

Wednesday, March 18, 2015

Little Chick Easter Treat

In my opinion, this is one of the cutest favours I've managed to make from the Curvy Keepsake die to date. My adorable little spring chick, she's perfect for Easter.


Again the little tummy is filled with a treat, this time it's 2 peppermint patties. I forgot to use foam mounting squares to attach the head so it was a little tougher to get the bow under the chin, but I managed to make it work.

Supplies used:
Cardstock: Bazzill
Ink: all SU - Daffodil Delight, Tangerine Tango
Die: Curvy Keepsake
Punches: see below list
Misc.: ribbon (seam binding - Always Artichoke - SU), white gel pen.

Full punch art instructions below.


Thanks for stopping by! Hope to see you again soon.

Monday, March 16, 2015

Bunny Easter Favour

You probably knew this was bound to happen; I created a few more treats/favours from the Curvy Keepsake die for Easter. First up is this adorable bunny treat wrapper.


His tummy holds a little clear bag with 6 chocolate eggs.  As you can see I was very diligent and finished him from the back as well, although this is optional.


His head was attached with foam mounting squares for a little added dimension. This also makes attaching the bow a lot easier as that way there is a nice little gap between the body and head to fit the bow into.

Supplies used:
Cardstock: Bazzill
Ink: all SU - Chocolate Chip, Pumpkin Pie, Garden Green, Blushing Bride
Die: Curvy Keepsake - SU
Punches: see below instructions
Misc.: white gel pen, foam mounting squares, 5/8" yellow organza ribbon

Full punch art instructions below.


Thanks for stopping By! Hope to see you again soon.

Saturday, March 14, 2015

Easter Basket

I'm a bit of a sucker when it comes to pretty boxes and basket dies (you may have noticed). So when I saw SU's basket Bigz die it made the top of my must have list right away.
I haven't had much time to play with it just yet but did manage to make one pretty little Easter basket last week.


I embossed the cardstock with a basket weave pattern before die cutting the pieces. I sponged a little ink over the surface to emphasis the texture a little and assembled it.
It comes together quite easily but to me it's a tad plain if left as is. I added organza ribbon to the handle and finished the sides with a little bow. The front of my basket features a punch art lilac blossom.


and the top of the handle, I just couldn't resist, I added a pretty butterfly die (sponged with several coordinating shades of ink)

Supplies used:
Cardstock: Bazzill
Die: Berry basket Bigz - SU, Butterfly Basics Thinlits - SU
Embossing folder: basket weave - Darice
Ink: all SU - Crumb Cake, Wisteria Wonder, Always Artichoke, Crushed Curry, Pumpkin Pie, Tangerine Tango, Basic Black
Punches: Itty Bitty Accents (4 petal flower) - SU, Blossom Petal (largest) - SU, Bird Builder (leafy stem)( - SU
Misc.: 5/8" organza ribbon, foam mounting squares

Thanks for stopping by! Hope to see you again soon.

Thursday, March 12, 2015

Curvy Keepsake Easter Favours

On Easter we usually have family over for brunch and I like to decorate our table to match the occasion. Painted eggs are generally my centre piece (I have a white wire display in the shape of a rabbit that holds 1 dozen eggs). I also like to place a little favour on everyone's plate and the SU
Curvy Keepsake box is just the perfect size for this.

Here's the simple little design I came up with for this year.


As you can see each favour contains one little chocolate treat. I used little Lindt chicks and bunnies but I have seen other brands out there as well. Wal-Mart for example has some Belgium ones and even Doll-A-Ram had some last year that are imported from Germany.


I find the bunnies worked better in the actual Curvy Keepsake as the chick were a little taller. I therefore also made a "handles side" only version to accommodate a taller chocolate. I think either way these are just the cutest little things.


Supplies used:
Cardstock: Recollections 110 lbs white
Stamp: Sheltering Tree - SU
Ink: all SU, various colours for the blooms: Daffodil Delight, Rich Razzleberry, Perfect Plum, Pumpkin Pie, Old Olive, Pear Pizzazz
Die: Curvy Keepsake - SU
Punch: 1 3/8" circle
Misc.: 5/8" organza ribbon, 6" length of ribbon trim (I found this lovely green and yellow flower one at Doll-A-Ram for $1.50 for a 5 yard spool), a few strands of Easter grass, double sided tape (to secure the treat)

Notes: I punched the whole into the centre one of the "handled" sides of the box shape. Then I stamped my grass and little flowers. Note you may wish to mask the area of the opposite box side when stamping the grass as the image is rather long and will reach to the side. After assembling the box I added a little double sided tape to the inside of the base. I stuck my treat to the centre and then bunched up a few Easter grass strands and placed them in front/around the chocolate character.
Tie the bow at the top, add the trim and your are done/. If you like you can add a little tag with a name or sentiment as well.

The tall treat wrapper was made using only the two "handled" sides of the die. I also trimmed the base to approx. 1/2 - 3/4" width (just enough to accommodate the treat.

Thanks for stopping by! Hope to see you again soon.

Tuesday, March 10, 2015

Orchard in the Sky

I have one more card to share that was made using the Sheltering Tree set. It's a little different as I didn't actual stamp a tree. Instead I opted to use the top part of the stamp to create branches. Stamping all around the edge of the card gives it the illusion that the view is taken from beneath the trees looking up towards the sky.


I stuck with a spring cherry blossom theme, but you could do this with any of the seasons. I added several very tiny rhinestones for a little added glitz.

And here's a peek at the inside of my card.


Supplies used:
Cardstock: Recollections white, Bazzill coral
Stamp: Sheltering Tree - SU, Butterfly Basics - SU
Ink: All SU - Calypso Coral, Pear Pizzazz, Chocolate Chip, Blushing Bride, Basic Black
Misc.: tiny 1/16" and 3/16" clear rhinestones.

Thanks for stopping by! Hope to see you again soon.

Sunday, March 8, 2015

Sheltering Tree

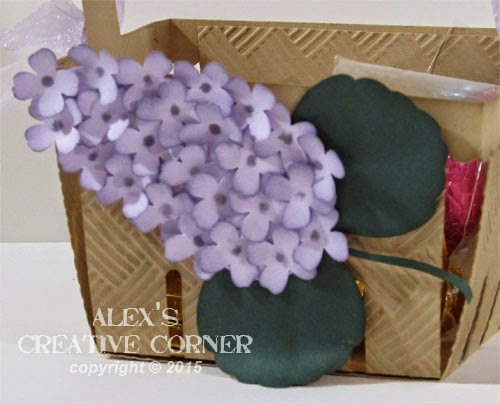
I wasn't sure which one of my new stamps sets to try out next until I came across a fun challenge at SCS entitled "Sheltering Friends". A that point I knew Sheltering Tree was the next set to get my attention.

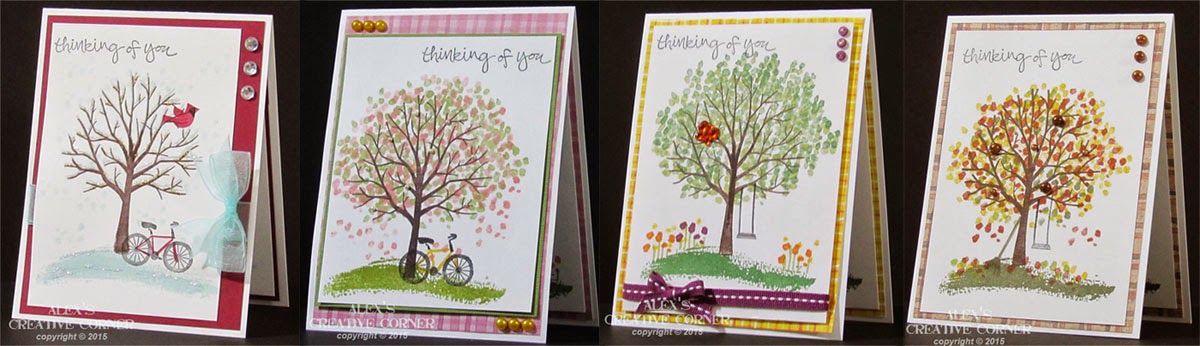
I had so much fun playing with these stamps I made four cards to represent each of the seasons.
They look so pretty all in a row. Almost to nice to use.

 
Even though it's a little bare compared to the others, winter seems to be my favourite (funny considering I usually lean towards warm autumn colours). I added a bit of glitter to my snow with PSX sparkles for that extra special touch.


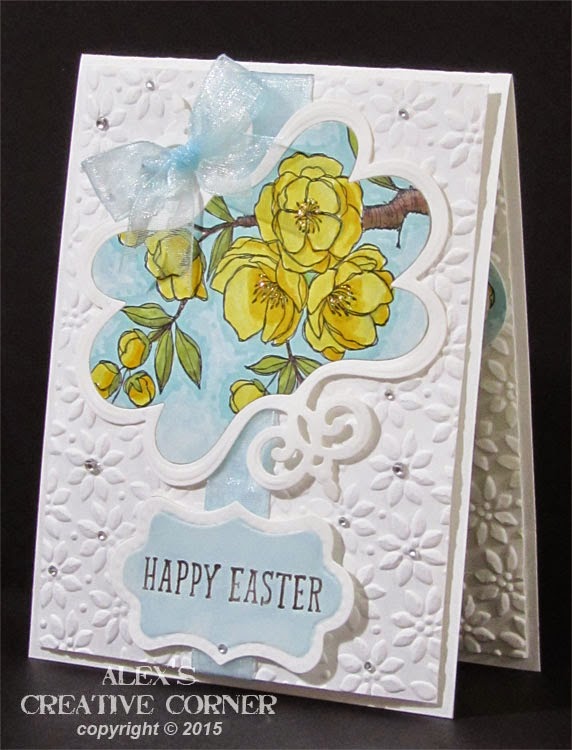
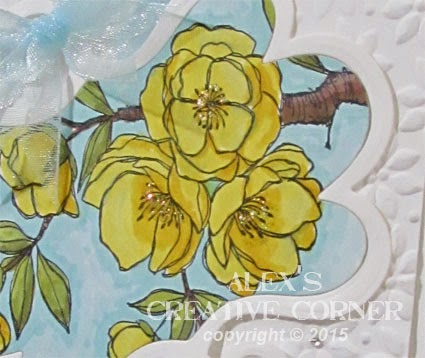
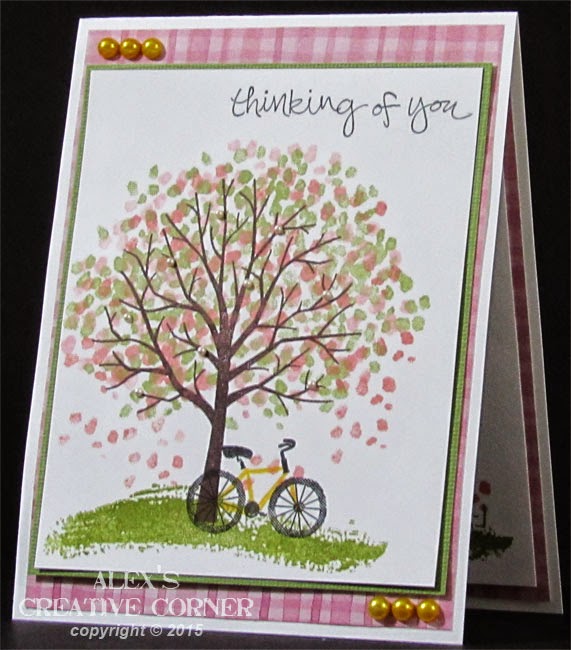
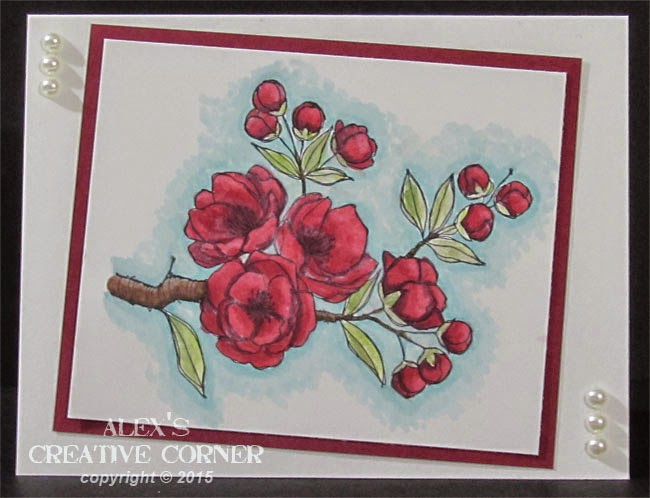
For the spring theme I decided on cherry blossoms just as they are finishing and falling from the trees. It not easy to spot but I added tiny little pearls coloured with alcohol markers to the blooming tree. The pearls at the top and bottom of the card were also coloured with markers.


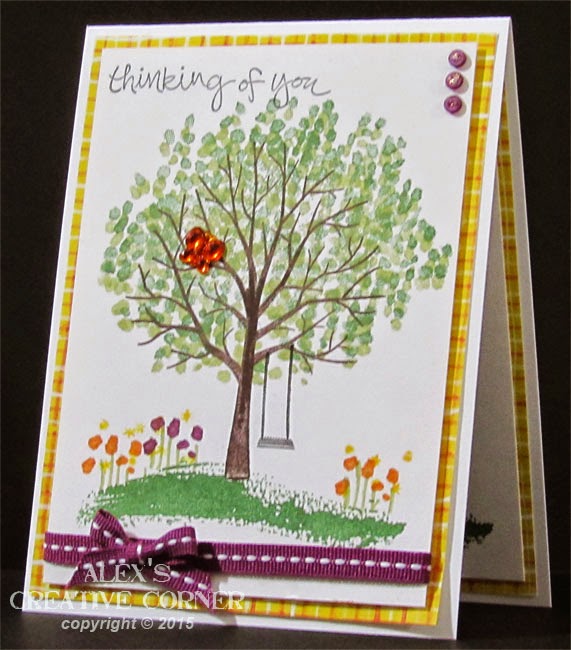
Summer has very vibrant colours and pretty flowers. I do not currently have purple Blendabilities so I opted for little accent buttons instead of coloured pearls.  I also had this pretty gem butterfly in my stash that seemed to fit nicely.


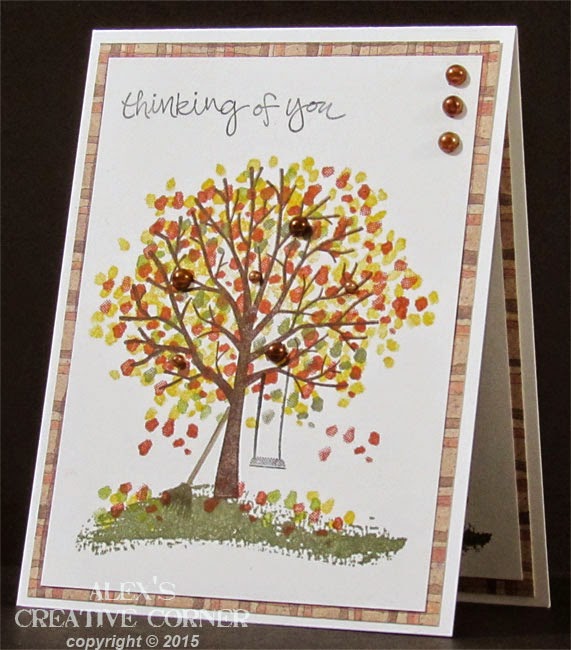
Fall comes to life in pretty golds and brown, and a few coloured pearls.


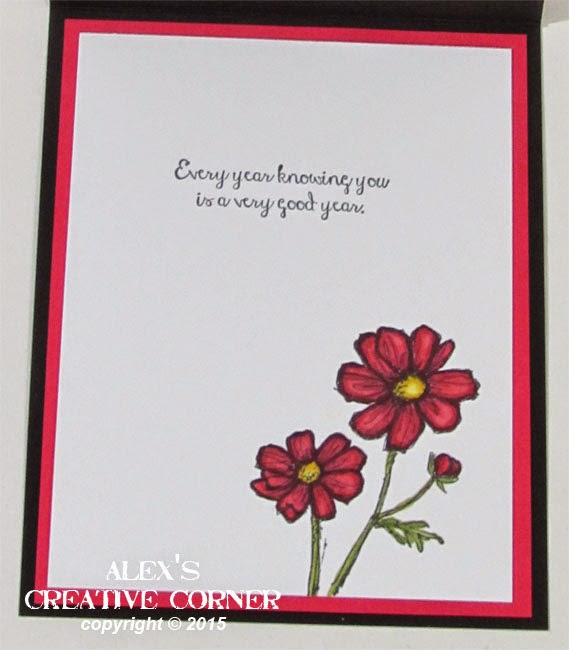
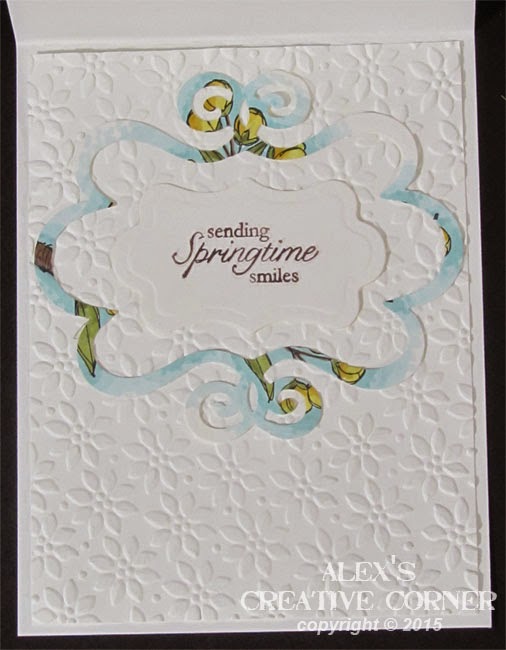
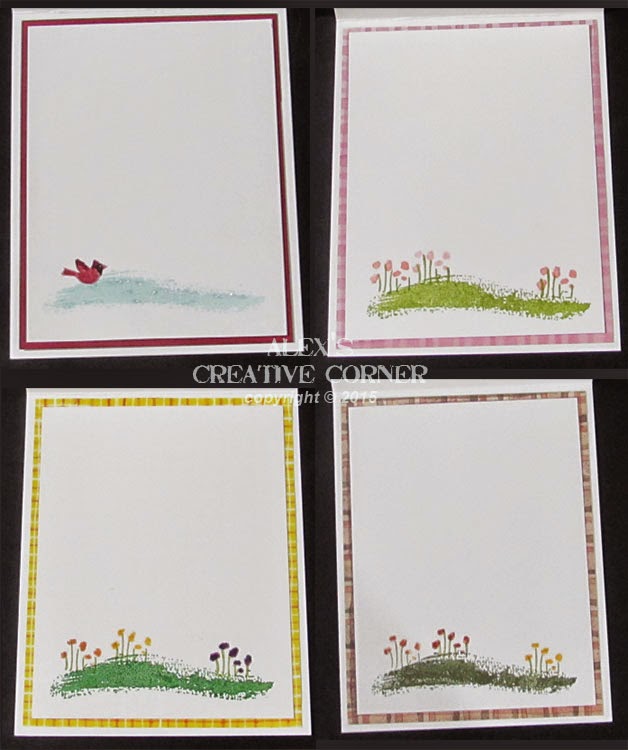
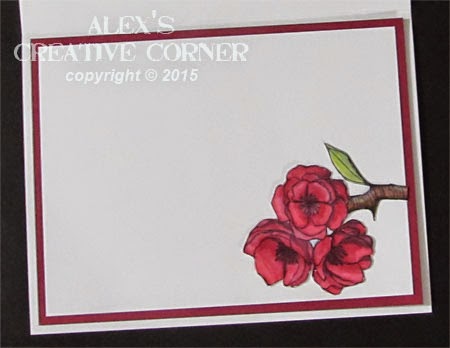
I also made the insides of the cards to match. I didn't add a sentiment here though in order to leave room for a personal message.


Supplies used:
Cardstock: Recollections
Patterned paper: various old plaid scraps
Stamp: Sheltering Tree - SU, Festival of Trees (bird) - SU
Ink: all SU
       Winter: Soft Sky, Chocolate Chip, Cherry Cobbler, Basic Black
       Spring: Pear Pizzazz, Blushing Bride, Chocolate Chip, Basic Black, Crushed Curry
       Summer: Garden Green, Pear Pizzazz, Daffodil Delight, Pumpkin Pie, Rich Razzleberry,
                       Chocolate Chip, Basic Black
       Fall: Old Olive, Cajun Craze, Crushed Curry, Always Artichoke, Chocolate Chip, Basic Black
Blendabilities Alcohol Markers, to colour my rhinestones and pearls: Soft Sky (rhinestones), Skin
                      Tone, Daffodil Delight
Misc.: Rich Razzleberry stitched Ribbon, light blue organza ribbon, pearls, clear rhinestones, rhinestone/gem butterfly, tiny 3/16" purple buttons, foam mounting squares

Thanks for stopping by! Hope to see you again soon.

Friday, March 6, 2015

Blendabilities Take Two

I needed to play a little more to see if I could get a better feel for colouring or if I'm a lost cause.

So I tried the same Indescribable Gift blossom image with different colours.

This time I choose deep red tones and I think this works better. I liked working with the darker hues much more than the lighter colours.


I'm undoubtedly not done learning this colouring technique but I think this one turned out better already.  Here's a view of the inside of the card, which I made to match.


Again, I had to improvise and use green chalk with the colour lifter/blender pen to colour my leaves. Hopefully SU will solve the Blendadbilities issues ASAP ND I can get my Hands on some green markers.

Supplies used:
Cardstock: Recollections and SU
Ink: Basic Black - SU
Stamp: Indescribable Gift - SU
Alcohol markers: All SU Blendabilities- Cherry Cobbler, Skin Tone and Soft Sky
Misc.: pearls

Thanks for stopping by. Hope to see you again soon.

Thursday, March 5, 2015

Playing with Blendabilities, Take one

With my last SU order I received several packages of their new Blendabilities. I have never worked with alcohol markers before and the thought as a little daunting at first so I checked out several how to videos and dove in. I chose the blossom image form Indescribable Gift, courtesy of my lovely SU rep who provided me with a few stamped images (thank you Doris!).

My first try was not as successful as I had hoped (I'm a perfectionist), but I guess it still turned out better than  most would expect for a first attempt. I did use the finished coloured image on a card and it is rather pretty even with some imperfections in the shading.


I opted for light pink/peach shades for my blossoms and thought using the marker caps as a colour guide would be sufficient. I was wrong. Don't use the caps as an accurate indication of the colours. test them on a white piece of cardstock instead. As you can see my blossoms now have a mix of pink and peach instead off 3 shades of peach.

My Old Olive markers are on back order and I do not have any other shades of green. So to colour the leaves I used my blender/colour lifter and chalks (saw this technique somewhere on the web a few months back). It works well but the tip of the pen does absorb a lot of the chalk colour and is now stained.

I finished the inside of the card to match the front using only a partial blossom image. I left my card blank so that I can choose the appropriate sentiment once I decide to use it.


Supplies used:
Cardstock: SU and Reflections
Ink: assume this was SU Basic Black as the image did smudge a little during colouring.
Markers: SU Blendabilities: Skin Tone set, Soft Sky set and Smokey Slate set
Stamp: Indescribable Gift - SU
Die: Oval Framelits - SU
Misc.: pearls, foam mounting squares

Thanks for stopping by! Hope to see you again soon.

Tuesday, March 3, 2015

Lotus Blossoms

I have to take a little break form punch art this week in order to play with some of my new SU toys.
First up is my try at the Lotus Blossom SAB stamp set.

I absolutely love this stamp image and after seeing various lovely creations had to have it.

I discovered that this is one stamp you definitely need to experience with in order to get the desired distinct three shade effect. I had the best results when using black as my darkest colour.


I found that the contrast between my light and dark colours was not sufficient and had to stamp off the lightest to get it just right.

Here's a peek at the finished inside of the card as well. I opted for a third colour combination.
 

Supplies used:
Cardstock: Recollections white, 110 lbs
Ink: all SU - Real Red (stamped off once), Cherry Cobbler, Perfect Plum (stamped off once), Elegant Eggplant, Tangerine Tango (stamped off once), Cajun Craze, Basic Black, Pear Pizzazz, Always Artichoke
Stamps: Lotus Blossom - SU
Embossing folder: Elegant Lines - SU
Die: Apothecary Accents - SU
Misc.: 5 x 3/16" pearls, foam mounting squares

Thanks for stopping by. Hope to see you again soon.

Monday, March 2, 2015

Spring Frog Curvy Keepsake

I have one more spring themed Curvy Keepsake treat wrapper for you. This little critter was inspired my my daughters love of frogs.

 
He turned out rather cute and is currently one of my favourites. Here is a peek at the side view as well. You can see that he easily holds a TicTac package.


Supplies used:
Cardstock: Bazzill
Ink: all SU - Always Artichoke, Old Olive
Die: Curvy Keepsake
Punches: various, please see below instructions.
Misc. Black marker.

Full instructions below.


Thanks for stopping by! Hope to see you again soon.

Related Posts Plugin for WordPress, Blogger...