Saturday, September 27, 2014

Sweet little critter Hedgehog punch art

As I have many very old photos left to scrap most pages I am doing are rather quick and simple.
This one started out that way until I decided to make my own background paper.


The patterned paper was crated by stamping the background stamp four times in Perfect Plum. I then used coordinating marker shades to colour the little hearts and then sponged the paper edges with Crumb Cake.

The idea for the little punch art critter came from my little cousins dress. If you look closely at the pattern it is covered in little hedgehogs (sorry it's so blurry).

 
Supplies used:
Cardstock: Bazzill
Patterned paper: the purple is Karen Foster (just lightly speckled)
Ink: Perfect Plum, Crumb Cake, Early Espresso (on the hedgehog) - All SU
Ink Markers: Crumb Cake, Early Espresso, Pool Party, Bermuda Bay and every possible shade of purple I have. All SU
Background stamp: Soft Swirls - SU
Letter Stickers: Francis Meyer
Misc.: 5/8" light purple organza ribbon, foam mounting squares, white gel pen, 1/4" black rhinestones. Hedgehog quills were inked with a white pearlescent pigmint ink (old Club Scrap)
 

Thursday, September 25, 2014

Foiled Christmas

I hate to throw away anything that may be of use sometime in the future (yes, I have a little bit of a hoarding problem). Sometime ago I purchased aluminum foil baking pans at the dollar store that I used to make medium sized lasagne. As we always ate the dish the same day I didn't use the silver cardboard lids that came with the pans. I kept them as I figured I'd find a crafting purposes for them at one point or another.

Well, the other day I was in the mood to make a few more Christmas cards and came across my little stash of silver cardboard. I decided to see if embossing would work. And low and behold it does work and looks great!

Here are the two cards I designed.

 
Supplies used:
Cardstock: Bazzill
Ink: Real Red, Basic Black, Basic Gray, Smokey Slate - all SU
Stamps: Mosaic Madness - SU, Tiny Tags - SU
Punches: Jewelry Tag - SU, Mosaic - SU
Embosing Folder: Modern Mosaic - SU
Misc.: 5/8" red organza ribbon, various rhinestones
 
 
Supplies used:
Cardstock: Bazzill
Ink: Real Red, Basic Black, Basic Gray, Smokey Slate - all SU
Stamps: Contempo Christmas - SU
Punches: Ornament - SU, large, wide oval - SU, scallop trim - SU
Embosing Folder: Lacy Brocade -  SU
Misc.: 5/8" black organza ribbon, various rhinestones, foam mounting squares
 
Here is a close up of the foil lids and how well they embossed.
I was able to get 2 cardfronts form one lid.

Saturday, September 20, 2014

Christmas Tree Stars

When I look at punch shapes I almost never see the intended shape at first glance. When I saw SU's new Tree punch I first saw a wonderful, large arrow before I saw the outline of a fir tree.
The stamps that match this punch intrigued me so I added the set to my last SU order.

Once I had it in my hands and punched a few trees I immediately thought of building a star from the triangles. That is how this large star ornament came to be.

 
Sorry, it's not the best photo. The star is rather large (around 9" in diameter); a little bigger than I had anticipated. It's still rather nice though and I think it will make a great gift topper.
 
A full star requires 18 punched tree shapes with the trunk cut off. I cut a large 4" diameter circle from scrap cardstock and used this to attach the centre pieces to. I then attached a little strip to the back of each outer section so I could glue the "points" on. I used my SU Scoreboard to score the centre of each point and in between each point to slightly fold and add dimension. I cut a flower (Tattered Florals - Tim Holtz - Sizzix) from silver mesh and a small snowflake (Festive Flurry Framelits - SU) to the centre. I finished the ornament off with a 3/4" white button and a large rhinestone. A piece of silver organza ribbon was attached so it can be hung (would look great over a door knob).

Once I had this ornament completed I thought a partial star would look amazing on a Christmas card.
So I proceeded to make these three. The first two are 5.5 x 5.5" and the last is a large 5.5 x 8.25" card. 

 
Supplies used:
Cardstock: Bazzill
Ink: Marina Mist, Night of Navy - SU
Stamps: Wondrous Wreath - SU, Festival of Trees - SU
Punch: Tree - SU
Misc.: foam mounting squares, various sizes of rhinestones

 
Supplies used:
Cardstock: Bazzill
Ink: Crushed Curry, Cherry Cobbler - SU
Stamps: Greetings of the Season - SU, Festival of Trees - SU
Punch: Tree - SU
Misc.: foam mounting squares, various sizes of rhinestones


Supplies used:
Cardstock: Bazzill
Ink: Perfect Plum, Smokey Slate, Basic Gray - SU
Stamps: Bright & Beautiful - SU, Festival of Trees - SU
Punch: Tree - SU
Misc.: foam mounting squares, various sizes of rhinestones

Monday, September 15, 2014

Popsicle Treat

This layout is of my duaghter when she was only 4. These photos are of the same summer as our house boating vacation. Luckily I had not cropped them into strange shapes (yet).


These pictures called out to me in need of a punch art accent on the page. As I realize not everyone has some of the retired punches I own I am providing three options to making very similar popsicles. Note these would be great on a card as well.

My title was created using foam letter stickers. I had this idea in my head that I could easily colour them using my inks. It didn't work quite as well as I had hoped. The inks wouldn't dry. I tried setting the ink with my heat tool. That just seemed to cause the foam to shrink. I then applied a light dusting of clear embossing powder to them and heated slightly just to melt the powder. That worked.


However, if you look close you'll see that I did the "POPSICLE" first and the letters shrunk quite a bit. When I then proceeded onto the 'TREAT" part I only heated them to set the embossing powder. These turned out better; much less shrinkage and they seem to have a better embossed effect.
My popsicle accents as well as the double matted photo are mounted with foam squares for a little extra dimension.

Supplies used:
Patterned paper: Blue- Provocraft, Puprle - Karen Foster, print I believe is Hot of the Press.
Cardstock: Bazzill
Ink: Every purple hue of SU I could find blended together.
Dies/Template: I used my large (8x10") circle Coluzzle
Misc.: foam squares, 12 x 1/8" purple metallic brads, SU paper piercing template & tool (used to evenly space my brads), white foam letter stickers (Dollarama), small hand-held tear drop punch - Fiskar, white gel pen.

Full punch art instructions for the popsicles below (to create "bites" I punched the popsicle with my 7/8" scallop circle - SU).


Thursday, September 11, 2014

Lazy Panda Punch Art

I looked at quite a few photos of panda bears before creating this big fellow. I found many images where Pandas were hanging on top of large branches and really loved that idea. So my panda is lazily posed on a big tree branch.


The branch was created by trimming down my tree die until it seems to have the right fit. Sorry but I didn't take a photo of just the branch. I decided not to try and make bamboo leaves and instead chose a background stamp to serve the same purpose. Again my Kanji greeting of Friendship is one associated with pandas.


Supplies used:
Cardstock: Bazzill
Ink: Garden Green - SU, Basic Black - SU, Soft Suede - SU
Stamps: Kanji Collection 2 - Stamp Workz, Bamboo Background - SU
Dies: Branch Tree - Tim Holtz - Sizzix
Misc.: foam mounting squares, white gel pen

Full punch art instructions below:


Coming up next: a few more layouts including one with a "cool and refreshing" punch art accent.

Tuesday, September 9, 2014

Curled-up Snake Punch Art

As I may have mentioned before, my daughter loves everything Asian. Hence I have quite a few Asian themed stamps as well as many Kanji greetings. This card was made with her in mind (she's still trying to convince me to let her buy a pet snake while she's still living with us).


The Kanji background stamp was a bare rubber stamp purchased on ebay. No company name or anything noted. The red mat was hand cut as my die doesn't have a 1/8" mat. I created a little twisted knot at the top of my tassel, it served the purpose of shortening the tassel length and also looks better that way. Note I researched the meanings of certain animals and a snake, amongst other things, represents patience. I therefore chose the corresponding Kanji.

Supplies used:
Cardstock: Bazzill
Die: Window Frames Framelits - SU
Ink: Real Red - SU, Basic Black - SU
Stamps: Oriental Characters/Kanji - unknown, Greeting - Kanji Collection 1 - Stamp Workz
Misc.: foam mounting squares, white gel pen, 5" gold tassel, corner rounder (for the greeting mat)


Full punch art instructions below:


Up next will be my panda card.

Saturday, September 6, 2014

Vacation Album and New Punch Art Preview

Today I have the last three pages of my vacation album to share (I still can't beleive I finally finished it) and then a quick little preview of my next 2 punch art cards.

Back to Nature


I tried to keep the main focus on the scenic photos. The background was created using several coordinating paper scraps. I stamped the light coloured cardstock with two background stamps. The title was created with alphabet stamps and my SU bitty banner punch. The little banners were attached with mounting squares for added dimension and hung from a bit of baker's twine fastened with mini brads. I then added a few skeleton leaves that were attached with glue dots.
 
Supplies used:
Cardstock: Bazzill
Patterned paper: unknown (scraps left over from some heritage pages)
Background stamps: Wonderfully Worn - SU, Distress - Impression Obsession
Alphabet stamps: All Around Alphabet, upper and lower case - SU
Punch: Bitty banner - SU
Ink: Chocolate Chip - SU
Misc.: brown/white baker's twine, antique brass 5 x 1/8" mini brads, 4 skeleton leaves, foam mounting squares, glue dots
 
New Beginnings

 
Gorgeous sunrise photo from our trip.
I cut triangular scraps from light orange cardstock to re-create sun rays behind the photo. The edges of my rays, photo mat and tags were inked with coordinating colours. I created the title using white rub ones (who said these were no longer an "in" thing?) I also couldn't help myself, I had to add a little bit of embossed metal foil tape. My flourish die accent was inked in various colours to match my button.
 
Supplies used:
Cardstock: Bazzill
Ink: Cajun Craze - SU, Crushed Curry - SU, Pumpkin Pie - SU, Early Espresso - SU
Die: Flourish 11 - Sizzlits - Sizzix, Tag- Accut Cut
Embossing Folder: Square Lattice - SU
Lettering: Making Memories - Simple Stated rub ons "Spring"
Misc.: 1" button, glue dots, aluminum foil tape.
 
Unexpected Guest

 
I actually created these cute little mice 2 years ago (around the same time as the bugs in my last post) and then never finished the layout. I am honestly not sure what punches I used, best I can do is guess.
 
Supplies used:
Cardstock: Bazzill
Title: Stickers - Provo Craft, Chip Board letters: K & Co
Journelling: computer generated - Vintage Typewriter
Misc.: wiggle eyes, foam squares, chalk.
 
Punches used to create the basic mouse:
Head: Trimmed s. giant vase by PB, but you can easily use the ornament punch - SU,
Ear: 3/4" circle and 1/2" giant heart - PB
Legs: large heart - PB
Body: trimmed s. giant oval - PB
Hands:  small tulip - EK Papershaper
Nose: trimmed tiny heart - MU
Tails were created from various flourish dies - Sizzix.
The chubby mouse's body is a 1 3/4" circle.
 
And here is a sneak peek at my next punch art cards with an Asian theme.

Tuesday, September 2, 2014

Catching up on Scrapbook Pages

Let me start by apologizing for the length of this post. I usually do not write this much but the subject at hand seems to warrant it this time. I promise there is some creative sharing at the end.

As some of you may know, my venture into paper crafting started a little over 18 years ago.
I've always been crafty. One of my favourite TV shows back in the 90's was Aleene's Creative Living (some of you may remember it). It was this show that first got me interested in Scrapbooking. I was expecting our second child and thought making scrapbooks for the kids would be a great idea. I order a kit and dove right in.

Back then we did not have all the nifty little tools we have now. We were limited to ugly printed paper (anyone remember Paper Pizzazz?), tracing/cutting templates and stickers.
Punches and decorative scissors slowly made it onto the scene and we all went crazy.
I admit to buying more than 20 decorative scissors (I still have them as I can't seem to part with them). And everyone knows how much I love punches.

We seemed to have this need to cut every picture into shapes and of course scrap every picture ever developed. It seemed impossible to only choose a few of the best shots and actually leave a photo in it's original shape.

This resulted in very awkward pages. Many photos cropped to circles and oval (or worse) stuck on a page. If the photos were matted then deco scissors had to be used. The accents would consist of a few punched shapes or stickers, or marker doodles and borders.
A few lucky pages actual had a title but most did not. Journaling was rare at best.

Looking back on these pages I release now that my biggest mistake was staring with baby pictures.  I cringe inwardly at the mess I made of some of my most precious photos.

I therefore decided a few years back to redo some of these ugly first attempts. The question that came up was can I salvage some of the photos or do I have to start from scratch.

The photos in question of course were before everyone went digital. I have a rather large box containing negatives covering more than 10 years. The organization went as far as sorting negative packets into larger envelopes by year. Still very difficult to locate any specific event one might be looking for. I did manage to have the last 2 years of my pre-digital photo times organized into a binder with negative sleeves. Each set of negatives has an index card in front of it. But of course it would be too easy if the baby picture negatives were this organized.

So, having new pictures developed is not really a viable option for most of these pages I'd like to re-do. This means I'll need to work with what I have, circles and all. A daunting task I ended up not really wanting to face. I therefore left these old pages and continued making much nicer pages with my new photos.

Then 8 years ago I went back to work full time. And honestly with 3 kids and full time work, who can scrapbook on a regular basis? I sure couldn't. I spent less and less time in my scrap room and eventually photos weren't even printed anymore. I swear the last 7-8 years not one photo has been scrapped let alone printed. They are all saved on nicely labelled discs and that is as far as I got.

I did manage to create about a dozen or so digital pages (much faster) but was never happy with this way of scrapping. I  need to touch and feel and create with my hands. Sitting at a PC just isn't the answer for me. So again my photos sat waiting.

A few years ago I finally decided to get back into paper crafting. Scrapbooking seemed to big a project so I turned to cards. After all one can finish a card in a much shorter time period.

Then 18 months ago I revisited scrapbooking and actually managed to take a week and scrap 6 pages during my vacation. Once my vacation as over, sow as my attempt at getting back into scrapbooking; until this past month.

A couple of weeks ago, after a colleague at work asked me about scrapbooking and wanted to take a look at one of my albums, I finally decided it was time to get back into my room and scrap again.

I started by finishing up an old vacation album. It only needed 6 pages to be complete and the pages are only 8.5 x 11" in size. Should be fast and easy, right?
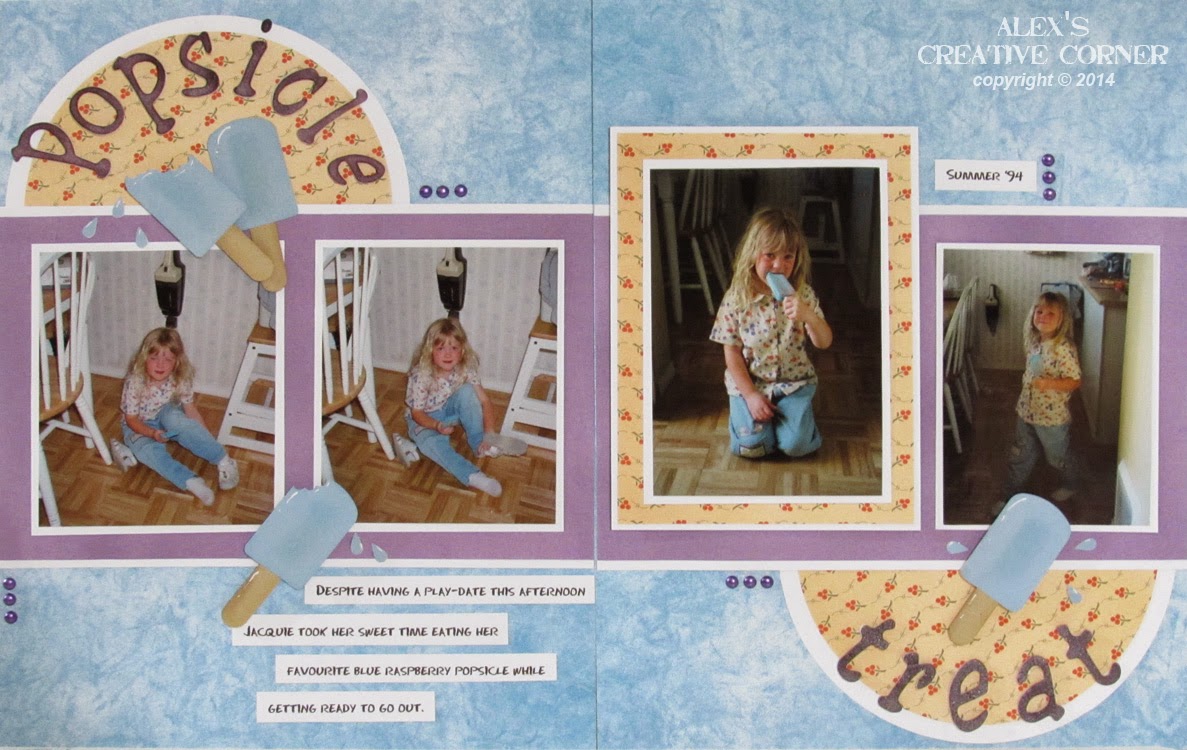
I also pulled out those old albums with the ugly first pages (also 8.5 x 11- didn't switch to 12 x12 until the early 2000) and redid a few pages. I figured I would leave some pages as they are as these first pages are memories in themselves. But having every page covered in awful shapes and stickers really isn't the way I want to leave my albums.

I'm sharing some of these pages today and in my next few post as I thought they would represent a nice mix of old and new supplies and techniques. Some pages contain punch art, some use SU stamps... there is a great mix of styles, techniques and supplies. I am a strong believer that not everything we created has to make use of the latest and greatest. Mixing it up can result in some wonderful creations. And most of all, as long as we are happy with what we've created it doesn't really matter what anyone else may think.

I hope my pages will inspire at least a few of you to dig into your old supplies and make use of them instead of letting them collect dust, or worse end up in the garbage.

These are all 8.5 x 11". When the photos seem to need more vertical space I often scrap my alyouts side ways.
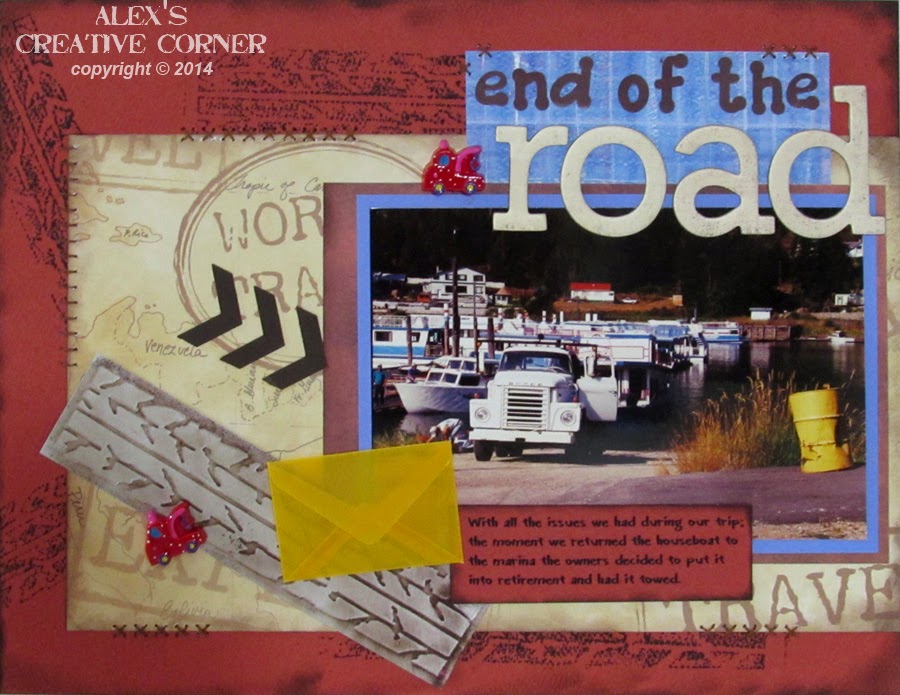
End of the Road

 
I inked the raised edge of my border embossing folder and used it like a stamp to create my background page. I pierced holes along severla paper edges (overlapping the edge) using my SU paper piercing template and then stitched the holes with embroidery floss. I also inked most of my paper edges for a more rustic look.
 
Supplies used (be forwarned I used a lot of old supplies):
Cardstock: Bazzill
Patterned paper: unknown scraps from my stash
Ink: Early Espresso - SU
Lettering: Stickers- Paper Adventure, Chip Board - Basic Grey Granola Collection Chip Board Alphabet
Embossing folder: tire tracks from Travel Signs 2 Borders - Sizzix - Tim Holtz
Punch: Chevron border - SU
Misc.: tow truck buttons, embroidery floss, yellow vellum emvelope - EK Sticko "Stuffed Ups", Essentials Paper-Piercing Pack - SU, needle.
Journaling was computer generated- font is called "Baloney"
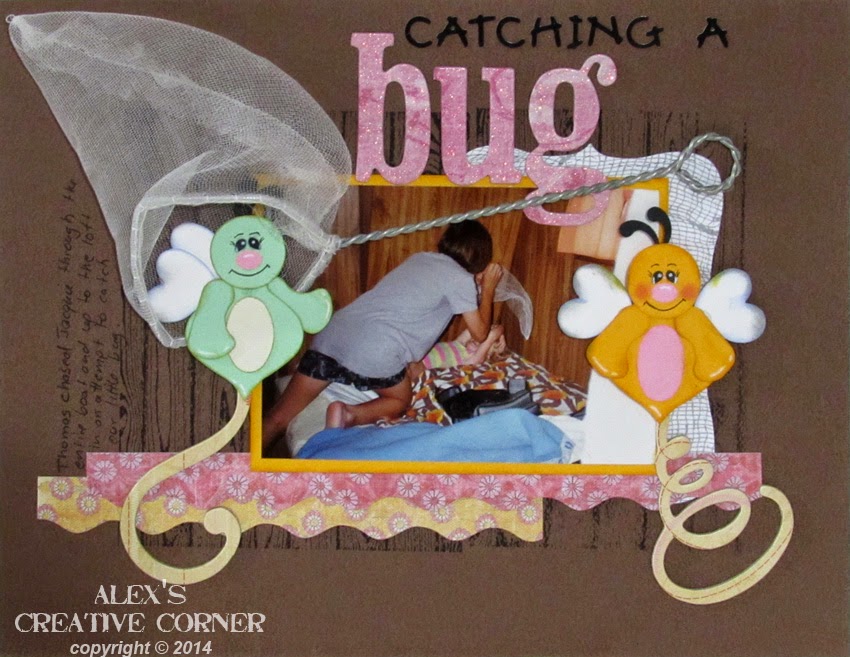
 
Catching a Bug
 
 
These cute little punch art bugs were the predecessors of these bugs. I had created them using old punches that are retired and then re-did the design in new punches (yes, the basic idea for this layout was started 2 years ago, then put aside and never finished).
I stamped my background in the centre of the mounting page (twice, side x side) I also stamped white cardstock and then die cut it with my top note die. The journalling was done by hand.
 
Supplies used:
Cardstock: Bazzill
Ink: Early Espresso - SU, Crushed Curry - SU
Lettering: Stickers: Provo Craft Alphabities, Chip board: K & Co
Border Strips: Julianne - K & CO
Background stamps: Cheesecloth- SU, Hardwood - SU
Die: Top Note - SU
Misc.: little tiny butterfly net (Dollar store find), Chip Board swirls - Basic Grey Granola Collection Chip Board Alphabet, foam mounting squares, glue dots, black Zig marker
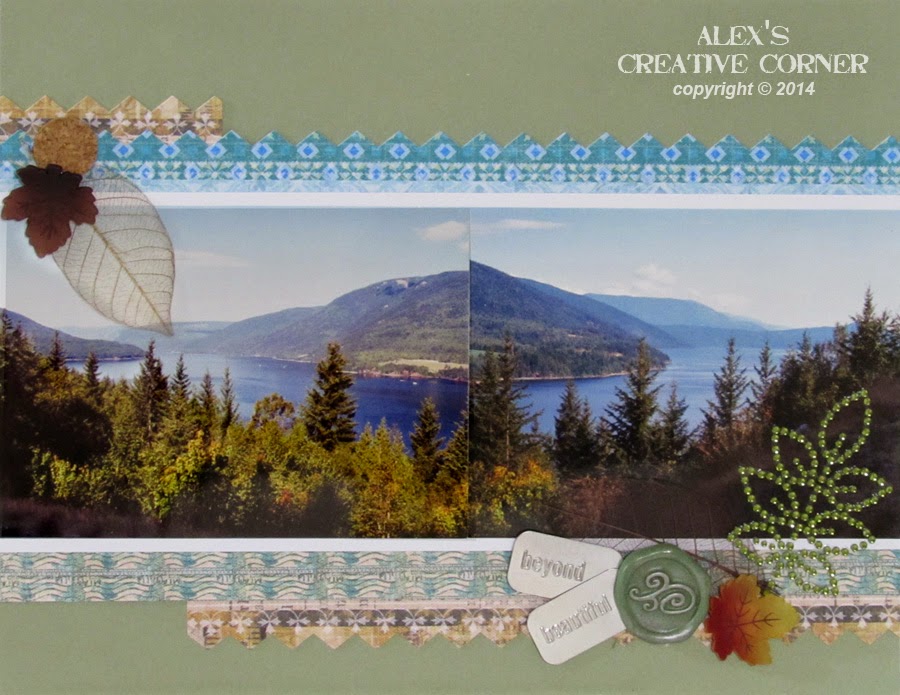
 
Beyond beautiful

 
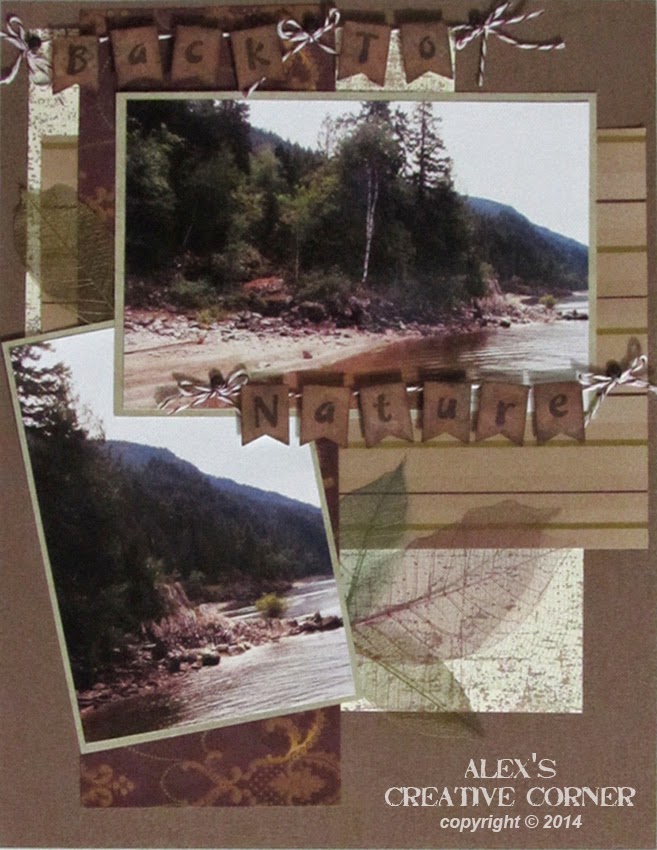
This is a very simple layout that keeps the focus on the scenic photos.  There aren't any special techniques to note.
 
Supplies used:
 
Cardstock: Bazzill
Border Strips: Julianne - K & CO
Title tags: Poetry Dog Tags
Misc.: skeleton leaves, cork circle, resign leaves (Dollarama), Faux wax seal - Creative Imaginations, Rhinestone leaf - Recollections, lots of glue dots.
Related Posts Plugin for WordPress, Blogger...