Tuesday, December 23, 2014

Poinsettia Hamburger Box

This was a very last minute decision. Upon receiving my SU order the other day I decided that poinsettias would look really nice as toppers for the hamburger Christmas treat boxes I was making for work.
So the men got the snowflake ones I made earlier, and the women received these poinsettia ones.


I used coloured vellum and heat embossed in silver. Then hand cut the poinsettia. I made 2 layers that were glued together with foam squares for added dimesnion. These were really simple and surprisingly fast to put together.
 
By the way, these boxes are the perfect size for a cookie sampler (4-5 cookies per box).
I placed a white cupcake liner inside that I flattened a bit to fit into the square shape. Inside that I placed 4 of our Christmas cookies.
 
Supplies used:
Cardstock: White Recollections, burgandy and green vellum, silver foil
Stamps: Joyful Christmas - SU, That's the Ticket - SU, Baroque Motives - SU
Ink: Versamark, Always Artichoke - SU
Punches: Ticket due - SU, large, wide oval - SU, Banner - SU
Misc.:  silver embossing powder, foam squares, pearls
 
Wishing everyone Wonderful Holidays!
 
Thanks for stopping by.

Sunday, December 21, 2014

A couple more Christmas tags

I have two further Christmas tags to share as well as the requested photo with the finished presents under our tree.

The first tag uses the Season of Peace stamp set.


The tree image was embossed in white, the background was sponged in three shades of purple using a torn paper mask to create the hills. For a touch of sparkle I added some rhinestone decorations. I inked the tag edges with dark purple and matted it on white. The name tag was made to match.

The second tag was made with Baroque Motives and an ornament.


For this one I embossed the flourish stamp in silver then randomly sponged a little purple over  the tag. The ornament was mounted with a little foam suqare and I added a silver ribbon bow and a large rhinestone. The little tag was sponged to match and attached with a small silver brad. I again matted my tag with white cardstock.

Supplies used as follows:
Cardstock: Recollections white
Ink: Perfect Plum, Wisteria Wonder, Elegant Eggplant - all SU
Stamps: Season of Peace, Boroque Motives, Tags Till Christmas - all SU, Rummage Alphabet - MM
Punch: Ornament - SU
Misc.: silver and white embossing powder, 5/8" silver organza ribbon, 1/4" purple satin ribbon, foam mounting squares, rhinestones, 1/4" silver brad.


And here are the promised tree and present photos.


Thanks for stopping by, hope to see you again soon.

Friday, December 19, 2014

Church Christmas Card

I send many of my Christmas cards to relatives living in Germany. It is very common there to have a church scene on Christmas cards. I do not currently have stamp set with any church images and therefore decided to try and create one with my punches.

It was actually easier than I thought and came together rather quickly. This would look great on a  starry night background, or a snowy scene. The church (or chapel) would also work well for wedding theme, maybe even for a baptism.

 
I tried to add a lot of detail to the church itself. I embossed the shingles on the roof tops, bricks on the building and even attempted a stained glass look on one of the windows. I backed my window frames with vellum that was coloured from the back with markers. The plain windows are just highlighted in yellow to create a lighted look.

Supplies used:
Cardstock: Bazzill
Ink: Early Espresso - SU, Cherry Cobbler - SU, So Saffron - SU
Markers: Various SU
Embossing folders: Adorning Accents (roof) - SU, Brick - Tim Holtz, Lacy brocade - SU
Die: Apothacery Accents Framelits - SU
Punches: Large (wide) oval - SU, Decorative Label - SU
Misc.: 3 x 1/4" rhinestones, 1/2" silver ribbon, foam squares

Full punch art instructions below. Note my Photoshop (old CS) stopped working a little while ago and until I can afford to buy a newer one I'm struggling with Gimp. So please bare with me if the isntructions don't look quite as good as they normally do.

 
Thanks for stopping by, hope to see you again soon.

Tuesday, December 16, 2014

Asian Screen Card

I'm sure I've mention several times before, my daughter is very into Japanese/Asian art and design. She loves Sakura blossoms, dragons, Kanji... high on her wish list of items are currently both an old Japanese trunk and screen.

So when I saw the current trend of screen cards I immediately thought of making an Asian themed one for her. I have to say I am not fond of the 4 screen version that is really popular right now. Although it looks pretty standing upright, I do not like that the greeting ends up on the back of the card (I'm a little OCD). I therefore made this into a 3 screen card.

I used 1 full sheet of 8.5 x 11, folded into three's. Note it fits a standard business envelope:


The top was trimmed with a corner punch and I used a square die to cut away a portion of each screen panel to create "legs". At first I was going to leave the bottom square, but I found the "legs" were not as sturdy as I had hopped. I then added the trellis die and love how this turned out. Not only is it much sturdier, but it looks lovely.

My flowers are embossed in gold on the red cardstock (very classic Asian colours, black, red, gold).
Both the greeting and well wishes panels are foam mounted, the tassel was strung over one of the scallop points and secured with a glue dot at the bottom. I also added black rhinestones along the top border for a little extra bling.

Supplies used:
Cardstock: Bazzill
Ink: Basic Black - SU, Versamark
Stamps: Art of the Orient  -SU, Friendly Phrases - Stampendous, Kanji Collection 3 - Stamp Workz
Punch: corner scallop - PB (I removed the corner guards so that I could punch a border)
Die: Square - Spellbinder , Lattice bigz - SU
Misc.: gold embossing powder, small gold tassel, 1/4" black rhinestones, 5/8" gold organza ribbon, foam squares

Up next I have one more punch art Christmas card. It's been a little hectic here so I'm still finishing the instructions.

Thanks for stopping by; hope to see you again soon!

Friday, December 12, 2014

Snowflake Christmas

With Christmas preparations I don't have much time today, but I though I'd quickly share these really simple and pretty cards I made last minute (I think I've now got everyone covered).

Thess come together really quick. I love the Northern Flurry embossing folder. It works so well on it's own, just add a greeting and a little sparkle/bling accent and you're done with great results.


On my second card I added a small stamped and die cut snowflake.


On both I used these little clear acrylic snowflakes I had purchased at the dollar store (Dollarama) again. Note they are a little bulky so not necessarily recommended for mailing unless you are willing to pay a little extra postage.

Supplies used:
Cardstock: Bazzill
Ink: Marina Mist - SU
Stamp: More Merry Messages - SU, So Many Scallops - SU, Festive Flurry - SU
Embossing folder: Northern Flurry - SU
Die: Festive Flury Framelits - SU
Punches: Decorative Lable - SU, 1 3/4" scallop cirle - SU
Misc. Foam sqaures, rhinestones, acrylic snowflakes


Thanks for stopping by; come back soon for more paper crafting inspiration.

Tuesday, December 9, 2014

Silver Bells Christmas Card

Okay, I have to confess, I have one more note tag punch creation to share.
Strangely enough this idea popped into my head while shopping with my daughter. We were at the dollar store browsing the Christmas décor aisle. I saw these little bells and thought to myself, " I can make bells with the note tag punch.".

So, without further ado, here are my gold and "silver" bells:


As you can see by the instructions below, these are really quite simple to make. You can decorate them with stamps or small punch shapes, or simple emboss the foil. I added a bow and some "greenery" (PB pine branch), but there are many punches and dies that would work for a little seasonal accent.
I think these bells would also work really well for a wedding card. Maybe accent with a bow and some doves.

Supplies used:
Cardstock: Recollections white, Bazzill green, gold & silver foil
Ink: Basic Black - SU
Stamp: Warm Words - SU
Embossing folder: Swirl baubles - Crafts Too
Die: Oval Framlits - SU
Punches:large pine branch - PB, , 1 1/4" square - SU (to create banner tails)
Misc.: 5/8" red organza ribbon, foam squares, 3 x 1/4" rhinestones

Full punch art instructions below:

 
Thanks for stopping by; hope to see you again soon.
 

Sunday, December 7, 2014

Stocking Stuffer Mini Purses

I have coveted the mini purse die for some time and finally broker down and ordered it this summer.
When I received it I ran it through my machine to do a quick test and then out it aside. It's been sitting and waiting to be used ever since.

Stocking stuffer's at our house generally consist of a candy or chocolate treat as well as several useful little gift items such as, Kleenex packs, travel lotions, razors etc. and Chapstick. Stocking stuffers are also generally not wrapped.  So I though this year I will put the Chapsticks inside a cute little personalized mini purse for all the ladies (and am still contemplating a tool box or fishing bag.... for the men).

Here are the first three I have created (I have 3 more to go).


Basic supplies used:
Cardstock: Bazzill
Embossing folders: Reptile - Darice (large pattern), Burlap - Tim Holtz
Ink: Smokey Slate, Basic Black - SU, Versamark, Pearl white - Club Scrap
Die: Mini Purse - SU
Misc.: Basic Gray Marker - SU, per purse 2 x 1/8" mini brad, closure - button or brad etc.

The black and silver "alligator" skin one is for my daughter - she loves alligator and gothic/dark tones are her preference.

 
I cut my purse die, then ran the cardstock through by Cuttlebug with the embossing folder. I then inked it with Versmark and embossed with clear embossing powder. The flap and bakc area i also sponged with a pearl white ink and heat set. The strapwas alos clear embossed and then attached it to eitehr side with a little 1/8" black brad. I added a pretty rhinestone flower with a glue dot to the frotn for the closure.
 
The pink and black creation is for my sister - she is a girly girl at heart.

 
This one is the same as the back with exception to the two tiones and that I only textured the pink carstock. The sides and strap are flat black, clear ambossed.

The last one was an experiment and I may keep it for myself.
 
 
This one was done with a smaller embossed texture. I did not clear emboss. I did sponge the purse with a little dark gray and black. The base of the purse is cut from medium gray. The edging from white cardstock that I inked with Smokey Slate. I also added stitching with my Basic Gray marker. The brads used are sliver and the closure is 1/4" square silver brad.

I love this die and can see many possibilities for it (birthday goodies, wedding favours...). I almost wish my daughter were still little as these would be a big hit with little girls. Guess I have to hope there will be little nieces or grandbabies sometime soon.

Up next I have another Christmas card featuring punch art bells.:


Thanks for stopping by, hope to see you again soon.

Wednesday, December 3, 2014

Christmas Treat Hamburger Box

For the last few years both my daughter and I have brought a little homemade treat to work for each of our co-workers. When we saw the hamburger die in the new SU catty we both thought of these treats and new I needed to buy the die (and truth be told the fry box is on my wish list as well).

As Christmas is now fast approaching, I realized it was high time I started on these little boxes. I decided to keep them fairly simple.


I stamped my cardstock with blue toned snowflakes, created a little snowflake ornament topper and added a little sparkle with some rhinestones and silver foil. They turned out very festive and "neutral" enough (IMO) that even the men should like them.

Now I only need to find the time to do the Christmas baking so that I have some treats to fill these with.

Supplies used:
Cardstock: Recollections white, Silver foil
Ink: Marina Mist,  Soft Sky, both SU
Stamps: Festive Flurry - SU, That's the Ticket - SU
Punches: Decorative Label - SU, , Ticket Due - SU
Dies: Festive Flury Framelits -  SU, Banner Framelits - SU
Misc.: Foam Squares, rhinestone

Thanks for stopping by;  come back soon!

Saturday, November 29, 2014

Birdhouse Christmas Wishes

Today I have another note tag punch creation. As I am still working on a few more Christmas cards I used this design for a Christmas theme, but it would also work well on most other cards.

I added a pretty cardinal to the top of my birdhouse, but it looks just as cute on it's own.

 
The cardinal uses old instructions I posted here last year. The only change is that I added a second wing in behind.
 
Supplies used:
Cardstock: Bazzill and Recollections.
Ink: Cherry Cobbler, Marina Mist, Always Artichoke, Basic Black, So Saffron - all SU
Stamps: French Script - SU, That's the Ticket - SU
Embossing Folder: Heart Entwined - Elizabeth Craft
Dies: Apothecary Accents - SU, Labels Eighteen - Nestabilities - Spellbinders
Punches (other than punch art): Ticket duo - SU, Mosaic - SU
Misc.: 5/8" red organza ribbon, 3 x 1/4" rhinestones, white gel pen, foam mounting squares
 
Full birdhouse punch art instructions below:


Thanks for stopping by; hope to see you again soon!

Thursday, November 27, 2014

Wonderful Wreath Tags

I have one more set of Christmas tags to share.
For these I used the new Wondrous Wreath set from SU.


I love having a matching die set for my stamps. So much easier than having to hand cut shapes.
Again my colour scheme is purple, silver and white.

I really like how the words look cut form foil cardstock. It lends a very festive finish to the tags.

Here is a close up for a better view at some of the details.


This one was quite simple. I sponged a little Wisteria Wonder on my white card. Then using Perfect Plum I stamped the music background. I cut my tags, inked the edges and matted them onto white, hand cutting a 1/8" border.
The wreath was stamped in Wisteria Wonder. The 2nd layer of leaves in Rich Razzleberry/Perfect Plum and the berries were embossed in silver. I die cut the bow and sentiment from silver foil. The little tag and banners were inked along the edges in Perfect Plum, and the name was stamped in the same colour. I added some silver mesh to the tag, attached the name tag with a brad and the wreath with foam squares.

Supplies used:
Cardstock: Recollections 110 lbs white, silver foil
Stamps: Wondrous Wreath - SU, Music Background - Hero Arts, Rummage alphabet – MM
Dies: Wonderful Wreath - SU, Banner Framelits - SU, Gift Tag # 3, large, Gift Tag # 3 small by AccuCut
Ink: Wisteria Wonder, Elegant Eggplant, Perfect Plum, Rich Razzleberry - all SU, Versamark
Misc.: silver embossing powder,  white ribbon, 1 x 1/8" purple brad, 1 - 1/4" rhinestone, silver mesh, foam squares
 
I expect to have some time to finish the instructions for my Christmas birdhouse card (shown in my sneak peek image from the other day). So come back soon for the details.
 
Thanks for stopping by.

Monday, November 24, 2014

Most Wonderful Time of the Year

My daughter started to make fun of me every time I was turning the simple note tag punch shape shape into something new. In her words " Mom, you're crazy!". So I swore I would put aside my note tag punch and create without touching it again for a while.

Honestly, I really did try to ignore that punch, but for some strange reason it keeps calling to me.
Today's punch art project does use several other punches, but it could not be helped, I used the note tag again.

For you Canadians out there, my snowman just wasn't complete without a tuque. For everyone else, he needed a knitted winter cap on his head,. I just wasn't feeling the usual black felt hat.

I think most of you will agree that the little knit set he's sporting is the pefect fit for this winter (especially here in Calgary, as we've already had quite a bit of snow and lows of - 25°C this season).


The finished card measures 5.5 x 5.5".
I lightly sponged some snowy hills on the white card front and then added my finished snowman. I stamped my greeting onto a scrap piece of white card that I tore across the top to look like snow covered ground. Thsi was atatched to the bottom, covering the snowman slightly, with foam squares. Lastly I added several die cut snowflakes adorned with rhinestones for a little extra bling.

Supplies used:
Cardstock: white
Stamp: Holidays - Club Scrap, Tiny Treasures - Club Scrap (used the larg knit pocket to create the knit texture on my punch art pieces)
Die: Small Snowflakes (DIE100-F) - Impression Obsession
Ink: Soft Sky, Marina Mist - both SU
Misc.: rhinestones and foam mounting squares

Full punch art instructions below:


Thanks for stopping by! Hope to see you again soon.

Saturday, November 22, 2014

Festival of Trees Tags

I don't have too much time today as my youngest is celebrating his 16th birthday and the house is full of young men.

I have one more set of Christmas tags to share and also a little sneak peek of some punch art cards I'll be sharing soon.

Todays tags feature SU's new Festival of Trees stamp set. I have to be honest, when I first saw this set it was not on my must have list; but it quickly grew on me and when I placed my holiday order it was at the top of my list.

 
This was my first real try at creating a sponged winter background. There are places I still need some  practise, but overall I am quite pleased with how these turned out.
 
Unlike my previous tags, this time I started with cut tags.
I masked the moon with a sticky note circle punch out and I sponged the top half of the tag using three shades of purple. I created the hills by masking one section at a time with a torn strip of cardstock. I then stamped a tree in Elegant Eggplant and sponged a little Perfect Plum beneath it for a shadow effect. Next I used a scrap piece of white card and stamped another tree. I  added the garland with Versamark and embossed in silver and then added the ornaments and embossed in white. I punched out the tree and then sponged the little parts of background to match the area of the tag where I planned to palce the tree. For added depth i attached the tree with a foam square.
 
The little tag was sponged to match using the hills mask. I embossed the name in silver and attached this little tag with a 1/4" silver brad. A small star brad was added to the top of the tree and a torn and sponged strip was added to the bottom of the tag; infront of the tree. The finished tag was matted on white (hand trimemd to approx. 1/8") and then I added my silver ribbon and bow.
 
Here is a close-up of one of the tags.


Supply list:
Cardstock: Recollections 110 lbs white,
Stamps: Festival of Trees - SU, Rummage alphabet – MM
Punch: Tree - SU,
Dies:Gift Tag # 3, large, Gift Tag # 3 small by AccuCut
Ink: Wisteria Wonder, Elegant Eggplant, Perfect Plum - all SU, Versamark
Misc.: white and silver embossing powder, silver ribbon, 1 small star brad, 1 - 1/4" silver brad, foam squares
 
And as promised here is a sneak peek at my upcoming punch art cards.

 
Thanks for stopping by. Hope to see you again soon.

Friday, November 21, 2014

Bright & Beautiful Tags

My second set of Christmas tags features the new Bright & Beautiful stamp set from SU.
Of course the colour theme is purple again. I also used some of my silver foil card for a little extra bling.

 
All three are the same basic design, but I varied the colours of the different star layers. As you can see I used some full stars and some "frames" (doube die cut) stars.
Here is a close up for a better look at the little details.


Again, I basically used only white cardstock. The only exception is the large dark star; that is a purple/plum scrap, and the large star cut form silver foil. I used the same emboss resist as my previous tag.

I started by stamping a half sheet of cardstock randomly with a large stars using Versamark. I then embossed them in silver. Next I stamped the smallest star between the large ones with Versamark and embossed these in white. Using three shades of purple and a little Smokey Slate I sponged over everything; I removed the excess the ink from the embossed images with a baby wipe at the end. Next I matted the tag on white cardstock and trimmed the edges approx 1/8" all around.

I then stamped some stars and cut my different layers from cardstock, the largest in foil and glued them together as shown. I added some rhinestones and attached the finished star to the bottom of my tag. I again I didn't wish to use a to/from stamp so instead I cut a small tag, stamped the recipients name and sponged the background. I also stamped randomly with the little star stamp in Smokey Slate. I then attached the little tag, my paper ribbon , a bit of silver meash in two corners and a silver, star brad.

Supply list:
Cardstock: Recollections 110 lbs white, scrap of dark plum and some silver foil.
Stamps: Bright& Beautiful - SU, Rummage alphabet – MM
Dies: Star framelits - SU, Gift Tag # 3, large, Gift Tag # 3 small by AccuCut
Ink: Wisteria Wonder, Elegant Eggplant, Perfect Plum, Smokey Slate - all SU, Versamark
Misc.: white and silver embossing powder,  paper ribbon, 1 star brad, 6 clear rhinestone, foam squares, silver mesh.

Thanks for stopping by. Check back soon for more Christmas creations (there fill be some punch art coming up in a bit as well, just need to have a chance to write the isntructions).

Wednesday, November 19, 2014

Snowflake Christmas Tags

With Christmas only around five weeks away I am very busy trying to get all my paper crafts completed. The last week or so I've been working on making gift tags.

As you may recall from earlier posts, we've been going through some renovations at our house. The family room is completed and went through an entire overhaul including new furniture, and more importantly a completely new colour pallet. This of course means that I need to buy some new decorations (it all has to match, I'm a little OCD). In the past our tree and the present I placed underneath it, were gold, silver and basic black and white. With the new colour theme, there will be no gold, instead I'm adding purple to match the new accent colour in the room.

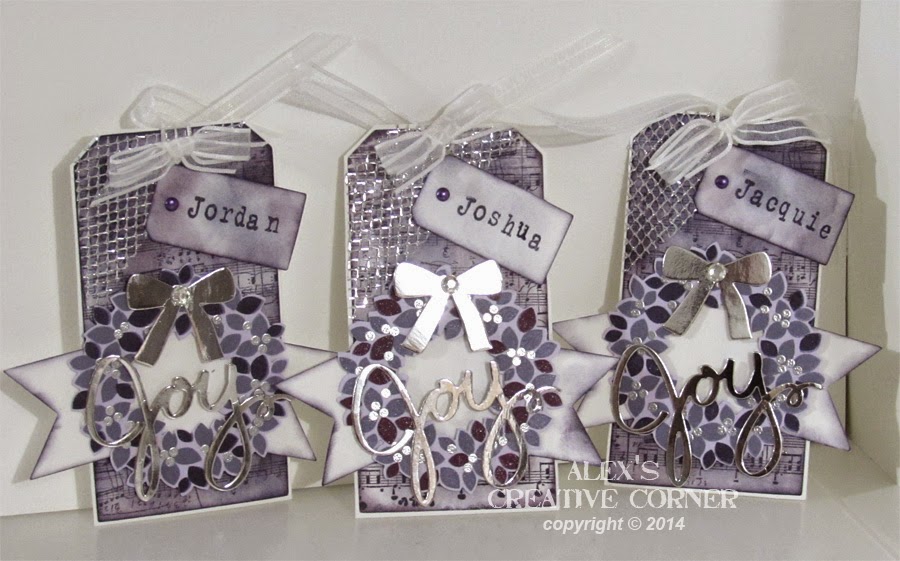
So, to make a long story a little shorter, my Christmas tags this year will consist of various shades of purple, white, silver and possibly some black.

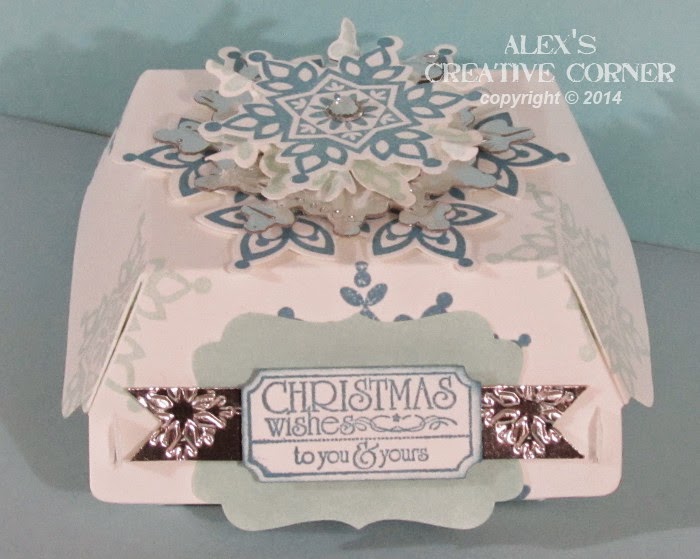
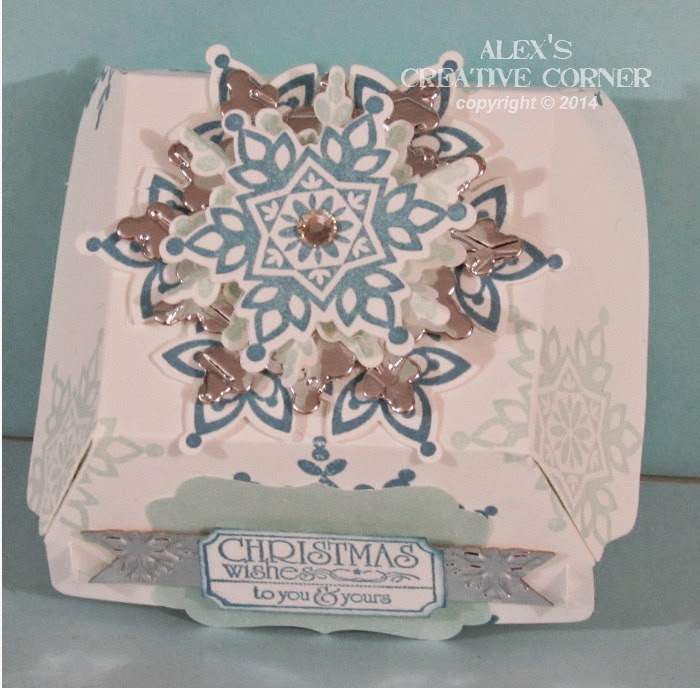
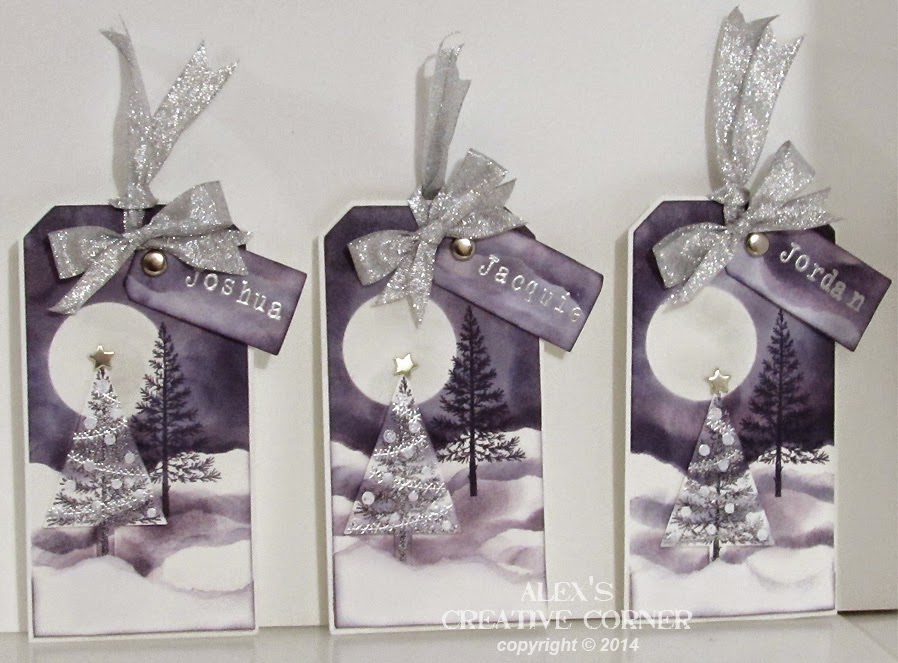
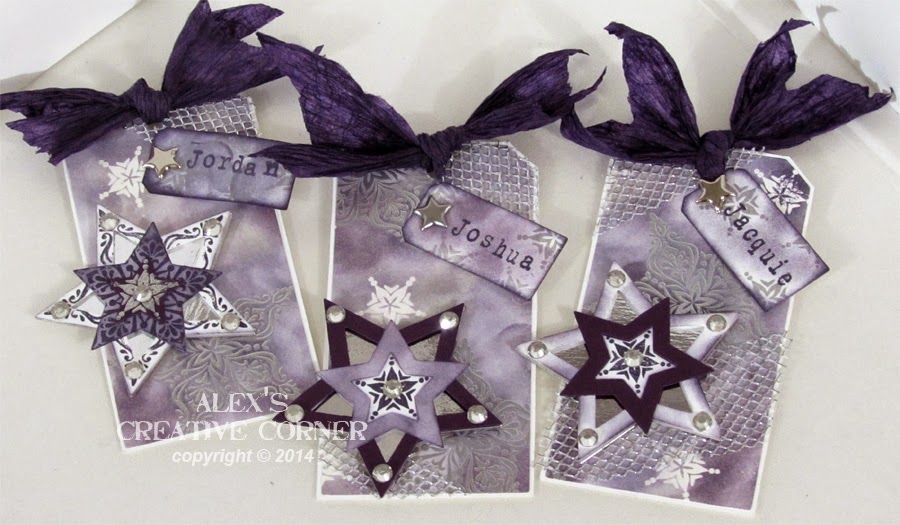
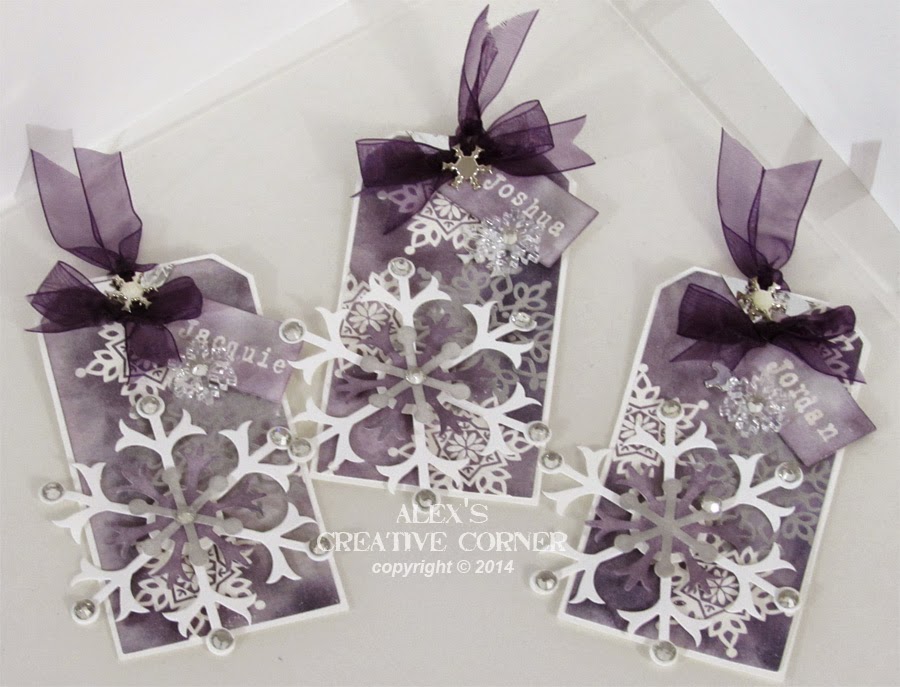
Here is the first set I came up with, featuring snowflakes. So far I have made one for each of my kids.

 
There are some slight variations between the three, but the basic design is the same.
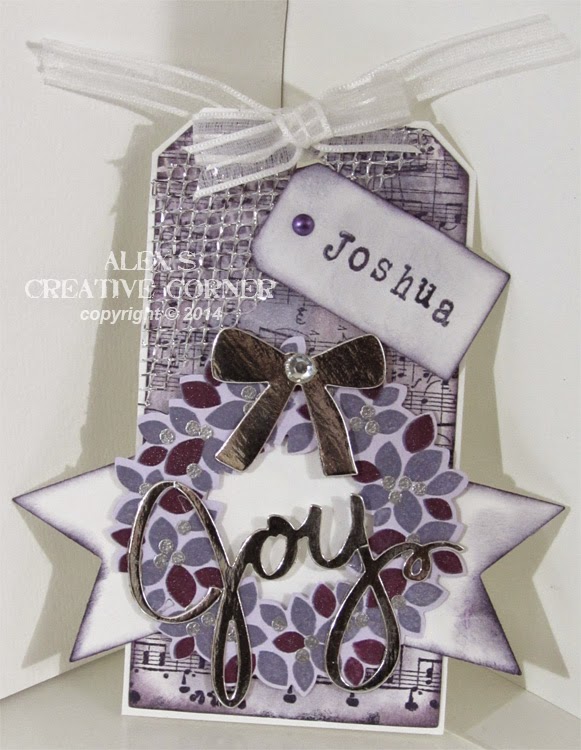
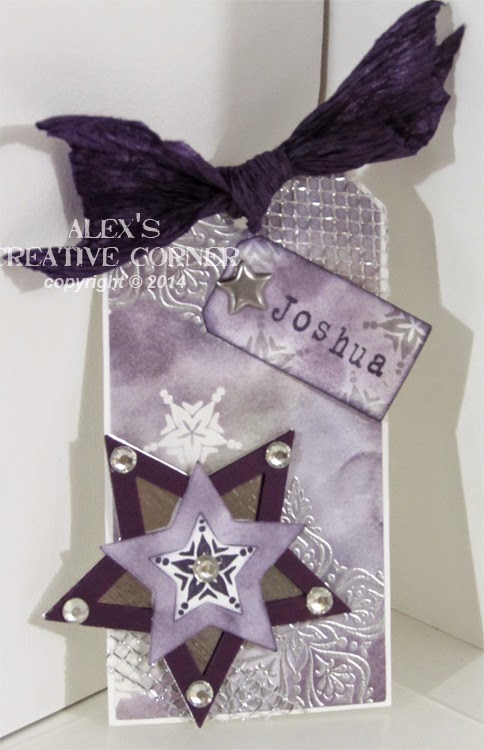
Here is a close up of one tag to show a little more detail.

 
I only used white cardstock. I started by stamping a half sheet of cardstock randomly with a large snowflake stamps using Versamark. I then embossed the snowflakes in silver. Next I stamped a smaller snowflake between the large ones with Versamark and embossed these in white. Using three shades of purple I sponged over everything removing the ink from the embossed images with a baby wipe at the end.

I then cut 3 large tags from this cardstock with my AccuCut die. Next I die cut the snowflakes form white card and inked the smallest in smokey slate and the middle one with Perfect plum. I glued the snowflakes together and attached it to the tag with some foam squares. Next I matted the tag on white cardstock and trimmed the edges approx 1/8" all around.
 
I didn't wish to use a to/from stamp so instead I cut a small tag, embossed the recipients name in white and sponged the background. Then I added this little tag as well as some ribbon, a bow, my clear snowflake and a silver snowflake brad to the top of the large tag. Lastly i embellished the large snowflake with some clear rhinestones.

Supply list:
Cardstock: Recollections 110 lbs white
Stamps: Festive Flurry - SU, Rummage alphabet – MM
Dies: Snow Flury - SU, Gift Tag # 3, large, Gift Tag # 3 small by AccuCut
Ink: Wisteria Wonder, Elegant Eggplant, Perfect Plum, Smokey Slate - all SU, Versamark
Misc.: white and silver embossing powder, 5/8" plum organza ribbon, 1 snowflake brad, 1 clear plastic snowflake, 7 x 1/4" clear rhinestone, foam squares.

Thanks for stopping by. Check back soon for more Christmas creations (there fill be some punch art coming up in a bit as well).


Saturday, November 15, 2014

Christmas Lanterns

I am almost at the end of my "Note Tag" creations. Today I have a wonderful trio of lanterns to share.
I added a bit of greenery and a bow and used them on some Christmas cards, but they could have many different uses.


I used the same basic design and identical supplies for each of the three cards.
First I stamped my music background on white cardstock. Then I cut the banner shapes. I generously inked the edges and sponged all over with So Saffron for an "aged paper" effect. The lanterns have been mounted on the large shape from the Apothecary Acccent dies which was embossed with stars and also inked with So Saffron. I used my Punch Bunch pine twig punch for the greenery but the Martha Stewart punch or any pine twig die would work just as well. Instructions for the little 3-d bow are also below.
Note that some parts of the punch art lanterns could easily be hand cut or cut using a paper trimmer. But I cut all parts with my note tag punch. After having played with that punch for so long I found this easier and faster.

Supplies used:
Cardstock: Bazzill
Ink: So Saffron, Crushed Curry, Cherry Cobbler, Always Artichoke, Early Espresso - all SU
Dies: Banner Framelits - SU, Apothecary Accents Framelits - SU
Punches (for the greeting): small and large oval by SU
Stamps: Music Background - Hero Arts, All Year Cheer I - SU
Embossing folder: Lucky Stars - SU
Misc.: clear and red 1/4" rhinestones, foam mounting squares, white gel pen

Little 3D bow instructions:


Card 1, small Lantern close-up:

Punch art instructions for small lantern:


Card 2, medium lantern close-up:
Punch art instructions for medium lantern:


Card 3, large lantern close-up:

Large lantern punch art instructions:


Thanks for stopping by! Hope to see you again soon.

Wednesday, November 12, 2014

Sweet Treat

Today I have a cute cookie themed creation to share.
This would work really well on gift tags accompanying a sweet treat from your kitchen - perfect for baked Christmas goodies.
 

Both the cookie sheet and the cookie jar were made using the Note Tag punch. The Greeting is also on the note tag pucnh (curved top has bene trimmed)

Supplies used:
Cardstock: Bazzill
Ink: Crumb Cake, Sahara Sand, Chocolate Chip, Basic Black, Cherry Cobbler - all SU
Stamps: Got Treats - SU, Crackle - IO
Dies: Top Note - SU
Misc.: foam mounting squares, 5/8" beige organza ribbon.

Full punch art instructions below (I split them into two separate recipes).


Thanks for stopping by; come back soon for more punch art creations.

Sunday, November 9, 2014

Christmas Candle Trio

If you recall I mentioned in my post featuring the bird bath and fountain punch art that I came up with that particular design while making candle holders. Well, today I am sharing that Christmas candle holder card.

It features a trio of different candle holders, all made from the note tag punch. Each candle holder design can easily be used for a bird bath, fountain, outdoor planter or pedestal design as well.

This card is a large 5.5 x 8.25", half sheet, card.


I added a few pine twigs made of super jumbo fern punch pieces behind the candle holders. The candle holders were decorated with small pearls for a little extra bling. I mounted the largest candle holder first, then the medium holder with one layer of foam squares. The smallest candle in the front was mounted with 2 layers of foam squares to create perfect depth.

Supplies used:
Cardstock: Bazzill
Ink: Cherry Cobbler, So Saffron, Always Artichoke, Pumpkin Pie, Crushed Curry, Early Espresso - all SU
Stamps: French Script background - SU, Fun Phrases - SU
Misc.: pearl bling, foam squares, 5/8" red organza ribbon.
 
Punch art instructions for the three candle holders and the basic candle below:

 
Here is a quick example of how the candle holder design can be used for planters and display pedestals.

The planter plant is made of three (3) mega grass shapes (Nankong punch). My potted plant uses the following punches: Pot: Designer Label (cut in half) -SU, Bird Builder (10 - greenery) - SU, tiny flower - MU. I sponged my blue background with a little Marina Mist. The lattice was sponged with So Saffron and Crumb Cake and adhered over the background. I used three pieces that were trimmed to fit the card front. The small planter was glued to the card front. The pedestal, butterfly and greeting were mounted with foam squares.
Supplies used:
Cardstock: Bazzill
Ink: Basic Gray, So Saffron, Crumb Cake, Garden gree, Always Artichoke, Crushed Curry, Pumpkin Pie, Cherry Cobbler, Marina Mist, Early Espresso - all SU
Stamps: Dreams de Jour - SU, Label Love - SU, Crackle background - IO
Die: Lattice - Bigz - SU
Misc.: foam squares.

Punch art instrucitosn for just the planters/pedestals below.


Thank you for stopping by! Come back soon for more punch art creations.
Related Posts Plugin for WordPress, Blogger...