Wednesday, October 30, 2013

Chipmunk Punch Art

Today I have a cute little chipmunk punch art card to share.
I made this little fellow the same day I made the squirrel, but it took me a few days to write the instructions.

 
The greeting is from "Pretty Petites" by SU
Punches for greeting: petite curly lable - SU and 1 1/4" scallop circle - SU
Sall jute bow
Cardstock: Bazzill
Inks: Colorbox
Chipmunks head and paws are raised with foam dots
 
Here's a closer look at the background:

 
The leaves are the small birch punch by PB.
The tree trunk was hand cut from cardstock that I embossed with my SU Woodgrain embossing folder.
 
And here are the instructions for my little chipmunk:


Thanks for looking!

Thursday, October 24, 2013

Squirrel Punch Art

I just love SU's larger punches. They have some great shapes that allow for creating very nice sized pieces. I remember 10-15 years ago when the largest punch shape was a "large" approx. 1" in size. Most finished punch art was very small (1-2 inches) and missing so much detail. With all the wonderful larger shape's available now it is so muhc more fun to creating punch art pieces.

I've been playing with various shapes trying to make some cute woodland characters.
Not sure if I've nailed it yet, but here is the first little critter I came up with, my squirrel.

 
She'd be all too happy to share her acorn with you.
Supplies:
Cardstock Bazzil, Inks: Colorbox and a few older SU markers,
Greeting is from "A Round Arrray" by SU.
Punches for the greeting: 7/8" Scallop Cirlce - SU, and the hexagon - SU
 
Here's a closer look at the background I created:

 
I used the Woodgrain Embossing Folder by SU and then cut a tree trunk shape from the embossed cardstock. The pine needes are the S.giant fern by PB.
 
And full instructions for the little squirrel punch art is below.

 
Thanks for looking, come back soon for more cute punch art.

Sunday, October 20, 2013

Scarecrow Punch Art

For my next fall themed punch art project I made two scarecrows - Mr. & Mrs. Scarecrow to be precise.

The finished cards look as follows:


I didn't add a greeting to the front, this way they can be used for various occassion.
 
Supplies used:
Cardstock Bazzill
Patterned paper: Karen Foster
Die: Spellbinders Label 18 (largest)
Ink: Colorbox
Ribbon: 1/4" light brown grosgrain and natural cotton seam binding
Natural raffia
White gel pen
 
The basic punch pieces for both are the same, so I created a combined instruction sheet (see below).
The only thing not noted on the "recipe" is the little added decorative piece on their hats.
 
Mr. Scarecrow's little crow friend was made using SU Bird Builder and SU Owl Builder (for the little feet).
 
Mrs. Scarecrow's sunflower was made using a medium Daisy punch (PB), 3/8" circle (EK papershaper) and the smallest leaf from SU Blossom Builder.
 
Punch art instructions below:


Thanks for looking.

Thursday, October 17, 2013

Papa Crow Punch Art

And without further ado, today I haves the last missing member of our happy little crow family - Papa Crow.

I created an autumn farm scene for his card background:

 
The hay stack was cut free hand. The ladder as made from cardstock strips. The little rake is a medium Emagination punch and the weeds are a large grass punch by PB.
The fence was made using SU Word Window and the cloud in the sky was punched from embossed cardstock (Cuttlebug Bubbles) with PBs s.giant cloud punch.
 
 Here is Papa Crow in the field:


I added a little "wheat stem" made from 3 leafy stems (SU - Birdbuilder punch).  He's also carrying a little greeting hung with twine  (SU Teeny Tiny Wishes, Word Window and Modern Label).
Cardstock is all Bazzill, inks are Colorbox. I also used some of my EK markers on the haystack.
 
Punch art instructions for Papa Crow are below.


Thanks for looking. Come back soon to see more fall themed punch art.

Wednesday, October 16, 2013

Momma Crow Punch Art

As promised, today I am sharing my second crow punch art.

Little momma also needed a fitting fall themed background, so I made some corn cobs - instructions can be found in this post from last year. The only change is that I used a smaller oval punch- the large oval by SU and I embossed the cardtsock with my Cuttlebug "Mosaic" embossing folder.

 
The clouds are a s.giant cloud punch by PB and the sign post is an ACCU Cut die.
Greeting stamp is from "Small Script" by SU
Oh, I had forgotten this in the previous post; I embossed the white cardstock before punching my clouds using  my Cuttlebug Bubbles embossing folder.
Inks are all by Colorbox, cardstock is Bazzill.
 
Here is the finished project:
 
I thought little momma needed a little something, so she has a small sunflower in her beak.
The flower was made with two small daisies (PB, 1 tiny sun (PB) and the leaf stem from SU Bird Builder.

Instructions for Little Momma are below.

 
Come back for Papa Crow's instructions in my next post.
Thanks for Looking!

Tuesday, October 15, 2013

Baby Crow Punch Art

My favourite times of year are Spring and Fall. I love the beautiful colours these season bring.
Looking at the trees in our street I am saddened that Calgary doesn't have much of a Fall season.  It's only mid October and most of the trees are already bare.

None the less, the gold and orange leaves did inspire me to create some fall themed punch art.

Here is what I came up with - a little family of crows:

 
As cute as they are, they each needed a background that went along with the Fall theme.
 
My little baby crow ended up in a pumpkin patch:

 
Here's just the background:

 
The pumpkins were made using the large oval/small oval by SU, the large grapevine leaf from PB, and a small swirl - EK Papershaper. The stem was hand cut.
 
The Fence was made using only the Word Window punch by SU
The clouds are a s.giant cloud punch by PB and the sign post is an ACCU Cut die.
Greeting stamp is from "Thoroughly Thankful" by SU
 
Full instructions for the baby crow are below:

 
Next post I'll share my Momma Crow.
Thanks for looking!


Sunday, October 13, 2013

Brayer Night Sky

Here is my second brayer project, a night sky background.
Surprisingly this was harder than I thought. I don't mean the actual brayer technique, but choosing the right colors. My first two tries ended up so dark that my black stamped images could barely be seen.

It turns out this looks best with light to medium hues, and not very dark blues.

I made the following 2 Halloween cards.


The one on the left was my first try (using the lighter blues). I stamped the moon and found when stamping my witch image overtop it didn't show up very well eventhough I had heat set the pearlized ink. So for the 2nd card I masked my moon instead. This worked much better.

Here are the close ups and supply lists for each:


Supply list:
Cardstock: Bazzill

Ink: SU - Brocade Blue, and Bashfull Blue, old Club Scrap -  dark denim blue, Black Colorbox, pearl white- Club Scrap
Stamps: All Hallow's Eve - Inkadinkado, Little Shapes - SU, Greeting from Michaels dollar bin
Punches: Key tag - SU
Dies: Curved Borders 2 - Spellbinders
Dark navy grossgrain ribbon 7/8" wide, pop/foam dots, white gel pen


Supply List:
Cardstock: Bazzill
Ink: old Club Scrap - dark denim blue and SU night of navy, Black Colorbox, pearl white (for edging) Club Scrap and a little So Safron sponged over the moon.
Stamps: both the witch and the greeting: All Hallow's Eve - Inkadinkado
Dies: Tickets Framelits- Sizzix
Punches: 1 1/4" circle (for the mask, punched from sticky note), 1 1/4 ' square for the flag banners
Foam/pop dots, while gel pen.

Thanks for looking!

Saturday, October 12, 2013

Brayer Sunsets

Recently I decided I finally needed to try out my brayer. After all it had only been sitting in my desk drawer for a year or so.

It took several tries to get some nice results, but I think now that I know the basics to achieving this look I'll be able to re-create it more easily.

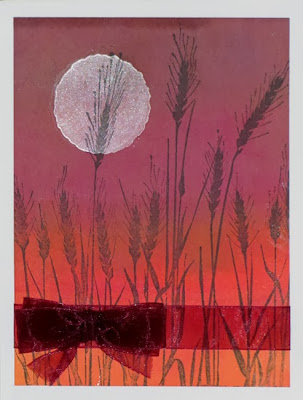
I love the the look of a brayered sunset, so that was my first project.

Here are the results after a few tries.


The one on the left is a little more muted and the colours blend better. This actually happened quite by accident. That was my second try at this technique (my first I ended up throwing out).

The transition from one colour to the next wasn't as smooth as I'd hoped and a bit too bright for my liking. So I brayerd a layer of brown chalk ink over top and then redid the darker hues. This resulted in a very blended and muted look. The second card is my third try and I had better results with the transition from one colour to the next.

Close ups and supply lists to follow:


Supplies used:
Cardstock: Bazzill
Ink: various (Orange, red, burgundy and purple dye inks and brown chalk ink), pearl - Club Scrap, Black - Colorbox
Stamps: Silhouette Grass - Hero Arts, Little Shapes - SU
burgundy organza ribbon 5/8" width


Supplies used:

Cardstock: Bazzill
Ink: various (Orange, red, burgundy and purple dye inks), pearl - Club Scrap, Black - Colorbox
Dies: Les Papillions (Butterfly) -Spellbinders, Window Frames - SU
Stamps: Silhouette Grass - Hero Arts, Little Shapes - SU

Thanks for looking!

Sunday, October 6, 2013

Snake Punch Art

Not sure exactly how I got to the snake. I was looking at the head of my punch art dragon and somehow "snake" popped into my mind.

I played a little with my punches and came up with this little cobra wanna be :)


I think he'd be really cute with a sentiment such as:
"I misss You", or "You're the bessst", or something like "Snake, Rattle & Roll", or "Slithering by to say Hi", or maybe even simply "Charming".
 
Supplies used:
Cardstock: Bazzil (snake is made from sparkling pewter)
Patterned paper: Provo Craft
Ink: Colorbox
Embossing folder; Sizzix Tim Holtz -Checkered
Foam dots, white gel pen
 
The basket was made using my Oval Framelits by SU and an oversize oval punch. But just the framelits will work as well.
 
Full instructions for the punch art snake are below.


Thanks for looking.
 

Saturday, October 5, 2013

Chaotic September and Masculine Cards

Boy has it been a crazy busy September.
Starting with back-to-school for my boys and my youngest having an accident at school in the first week that resulted in a broken arm to finally being able to start with our home renovations.

It's been tough trying to find a moment of peace and quite alone in my craft corner.
I did manage to make several great cards and punch art projects but have lacked the time to prepare the matching instructions to allow me to post and share with you.

So, to make a long story short, I will be posting several projects at ones in the next few weeks to try and make up for the lack of posts last month.

First a bunch of masculine cards I made (The 2nd was inspired by my youngest and his love for purple):
Here's a quick peek:


With the exception of the middle one, all use SU stamps. The "Extra, Extra" one uses Club Scrap.


Here are close ups and the short list of supplies:

 
Supplies used:
Stamps: Thinking of Father (SU), Greeting: Vintage Frames (SU)
Cordstock: Bazzill
Ink: Colorbox
1.5" ribbon, 3 - 1/8" brads, Twine and magic mesh, chalks, foam dots


Suplies used:
Stamps: Teeny Tiny Wishes (SU), Wolf (SU)
Punches: Word Window (SU), Modern Label (SU), Notebook edge (SU)
Embossing Folder: Houdnstooth - Cuttlebug
Cardstock: Bazzill
Ink : Colorbox
Mesh ribbon (1 3/4"), 3/4" button and twine, foam dots


Supplies used:
Stamps: Extra Extra (Club Scrap)
Embossing Folder: Script Texture - Cuttlebug
Inl: Colorbox
Twine and 3 - 1/8" brads, foam dots


Supplies used:
Stamps: Artifacts (SU), Vintage Labels (SU), French Script (SU)
Cardstock: Bazzill
Ink; Colorbox
twine, 1- 1/8" brad, metal frame tags, foam dots.

 
Supplies used:
Stamps: Thinking of Father (SU), Handbill Headlines (SU), Cheeseclotch (SU), Distress )Impression Obsession)
Cardstock: Bazzill
Ink: Colorbox
embossing folder: Houndstooth - Cuttlebug
Punches: large oval (SU), Scallop Oval (SU)
Compass nailhead, twine, 1 - 1/8" eyelet, 3 - 1/8" brads, foam dots

Related Posts Plugin for WordPress, Blogger...