Saturday, August 31, 2013

Litte Birdhouse Cards

As many of you know, I love punches and am always on the lookout to obtain retired once that I wasn't able to snag when they were current.

I have a list with those I want to own if I can find them at reasonable prices. Several on my list are of course by SU. Sometimes I can find one on ebay but usually the pricing is ridiculous.

Well thanks to my SU rep (thanks again Doris!) I have been able to cross off 2 punches from my wish list. Last month I was able to get my SU snowflake punch through her help and this month the My Way Arrow punch.

For me it's Christmas when I have a new punch to play with. Unfortunately work has been too hectic lately and I haven't had much time to play, but I did manage to finish my fist punch art project using the My Way Punch.

I think these turned out rather cute and they were quite fast and simple to make.


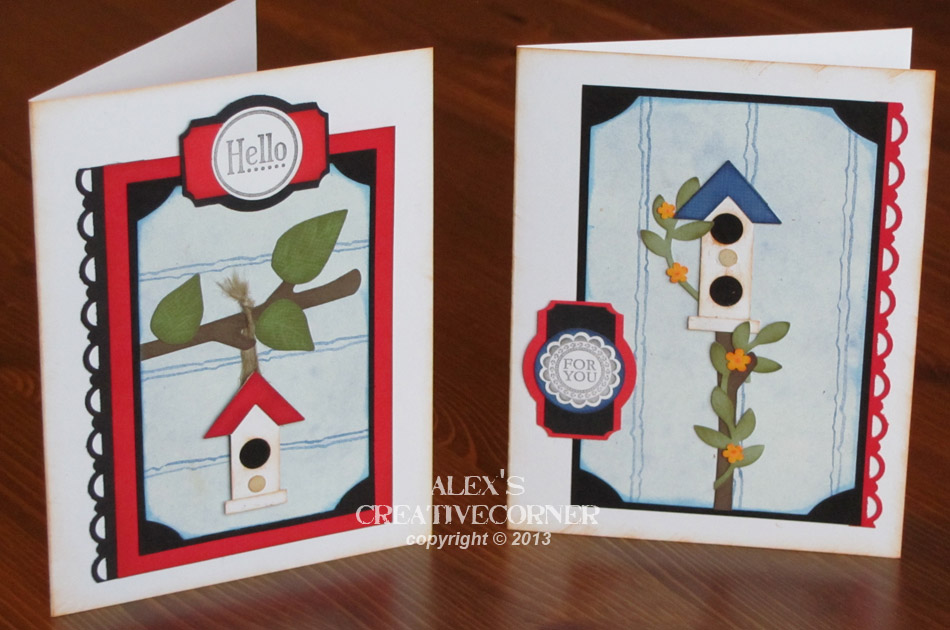
Here are close ups for a better look:


And as always my supply list and punch art instructions:
 
Punches other than for the punch art: Designer Label - SU, Ticket Due - SU, 1" circle - PB, 7/8" Scallop Circle - SU, Scallop Trim Border - SU
Dies: Ticket Corner Nesties by Sizzix
Cardstock: Bazzill
Patterened Paper: Old Provo Craft
Ink: Colorbox
Greetings stamps:Ciao, Baby - SU, Posy Punch -SU
Punches used for the punch art- other than to make the houses:
Bird Builder - SU, Flower corner - PB, Branch and 3 larger leaves: Branch and Leaves die by Sizzix
 
Bird house instructions (for the smaller one I trimmed the bottom of the arrow and only added 1 door/opening):


Thanks for looking.


Wednesday, August 28, 2013

Metal Tulip Card

I have one more metal art card to share. This time I went with a more feminine approach.
My inspiration was an old tin ceiling tile.


The metal doesn't seem to photograph as well as I'd hoped and some of the detail isn't showing up too well, but I think you can get the idea. The black paint is actually much more prominent than you can see in the photo.
 
here is a another try- this one is a flat scan.

 
Supplies used:
aluminim foil tape
Walnut Hollow Metal tool kit - distressing and textureing tools
Black acrylic paint
Die: Tulip by SU
Stamp: Perfect Punches by SU
Punches: scallop oval by SU
Cardstock: Bazzil
Burgudy organza ribbon, 7/8" wide
Pink satin ribbon, 1/2" wide
 
Thansk for looking. Come back soon for a new punch art project.

Wednesday, August 7, 2013

All Geared Up

Here's one more masculine metal art card to share. I love how the SU gear punch shapes work so well with this theme. In fact, having two boys I'm quickly becoming a huge fan of this technique.
I have some embossing folders that are just itching to be used for this (diamond plate, watches, gears...too many to list).

Hears my gears card:


Supplies used:
SU gear punch
Magi Mesh  (or drywall mesh)
Walnut Hollow Metal tool kit - distressing and textureing tools
Adirondak Tim Holtz alcohol ink
Black acrylic paint
Greeting was done on my PC
2 x 1/8" silver brads and foam dots

Monday, August 5, 2013

Metal Happy Birthday

Here's a quick share of another metal foil tape card.
I made this one for my daughter (she's giving it to a freind for his birthday).

This was actually my first attempt at this metal technique. Quick tip, if using embossed cardstock under the foil for your detials (or greeting) be careful when outlining the embossed image details as you can easily flatten the raised edges. Also, work from the inside of the design towards the outer edges so you don't trap air bubbles in the center.

 
Supplies used:
Aluminum foil tape (from hardware store)
Magic Mesh (or drywall mesh)
Embossing folder: Provo Craft - Cuttlebug Happy Birthday
Walnut Hollow Metal kit - distressing and texturing tools
Black acrylic paint, gold cream paint - Viva Inka-Gold

Sunday, August 4, 2013

Metallic Snowflake Card

The other day I came across a great tutorial on creating cards and card candy (accents) using aluminium tape. I've used aluminium tape before but not exactly like this. I was very intrigued.
The tutorial can be found here
 
I'm not quite as talented as the creator of that tutoril but I thought I'd give  it my best try. I can say for sure it was an awful lot of fun.
 
So far I have made 3 cards using this technique. The first 2 are very masculine (was kind of a given). Which I will share later this week. After makign those I wonderd if this would work for winter themed cards. So I gave it a try.
 
This is what I ended up with:


I quite like it, although I do understand not everyone would want this metallic look for Christmas.
In fact I revised the card a bit during my work process as my original design just didn't feel right.
 
First let's go through some basic supplies that will really aid in working with the metallic foil tape.
- A good pair of scissors
- a small stylus
- metal texture tools for added detail (I couldn't resist and bought the Walnut Hollow kit, image below)
- cardboard shapes of choice
- magic mesh or drywall mesh
- acrylic paint, alcohol inks or metallic paints
 
This is the kit I used, the tools can be purchased seperately as well:


For this card I punched 2 large snowflakes (Nankong and SU) from a cereal box back, and the medium snowflake (EK) twice from cardstock scraps and then layered them for the right thickness.
I then adhered to my cardstock backing, which has been embossed with the perfect polka dots embossing folder by SU.


As you can see in the above I had an embossed greeting on my card front as well, but later decided "peace' just didn't fit with the overall look.
I used a combination of cerulean blue acrylic paint and Adirondack Tom Holtz black alcohol ink.
 
The card front was attached to a white card base. I dressed it up with ribbon (charcoal grey and turquoise blue each 1" wide) and a little silver mesh. The greeting is by SU (Greetings of the Season) and the ink used is Sapphire Blue Pigment ink by Colorbox. 


Related Posts Plugin for WordPress, Blogger...